Toyota Sienna Service Manual: Manual Up / Down Function does not Operate on Rear RH Only
DESCRIPTION
If the manual UP/DOWN function does not operate, the power window motor, the regulator switch or the wire harness may be malfunctioning.
WIRING DIAGRAM
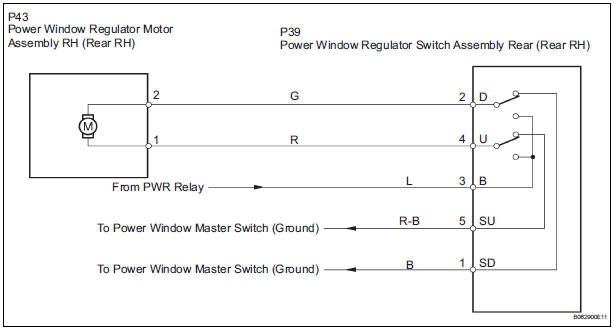
INSPECTION PROCEDURE
1 CHECK WIRE HARNESS (POWER SOURCE)
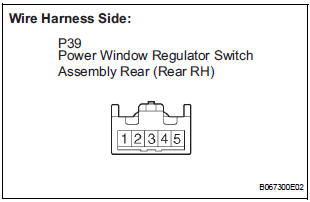
- Disconnect the P39 regulator switch connector.
- Turn the ignition switch ON.
- Check the voltage between the terminal 4 of the wire harness side connector and the body ground.
Standard voltage

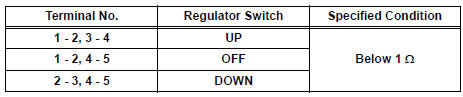
2 INSPECT POWER WINDOW REGULATOR SWITCH (REAR RH)
- Remove the regulator switch.
- Check the resistance between the switch terminals when the switch is operated, as shown in the table below.
Standard resistance
3 CHECK WIRE HARNESS (REGULATOR - MOTOR) (REGULATOR SWITCH - BODY GROUND)
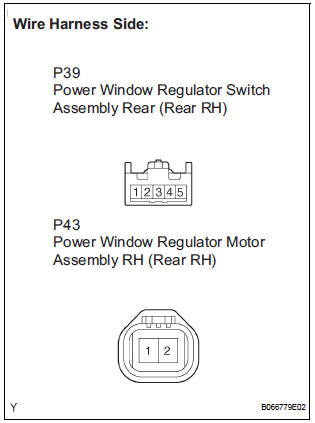
- Disconnect the P43 motor connector.
- Check the resistance between the wire harness side connectors.
Standard resistance

- Check the resistance between the P39 regulator switch connector and body ground.
Standard resistance

4 INSPECT POWER WINDOW REGULATOR MOTOR ASSEMBLY (REAR RH)
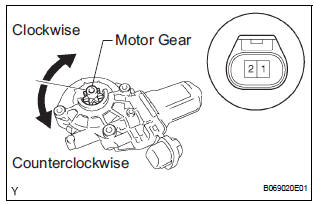
- Remove the motor.
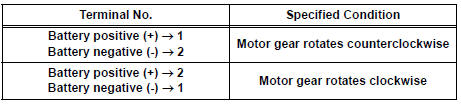
- Apply battery voltage to connector terminals 1 and 2.
- Check that the motor smoothly rotates.
NOTICE: Do not apply battery voltage to any terminals except terminals 1 and 2.
Standard
REPAIR OR REPLACE HARNESS AND CONNECTOR (MASTER SWITCH - REGULATOR SWITCH)
 Manual Up / Down Function does not Operate on Rear LH Only
DESCRIPTION
If the manual UP/DOWN function does not operate, the power window motor, the
regulator switch or the
wire harness may be malfunctioning.
WIRING DIAGRAM
INSPECTION PROCEDURE
1 CH ...
 Power Windows do not Operate at All
DESCRIPTION
If all of the door windows do not operate, no power may be supplied to the
power window master switch or
the power window master switch itself may have a malfunction.
WIRING DIAGRAM
...
Other materials:
Installation
1. INSTALL REAR NO. 2 SEAT ASSEMBLY
Lock the seat leg rear to the floor striker.
Lock the seat leg front to the floor striker.
Install the rear No. 2 seat assembly with the 8 bolts.
Torque: 19 N*m (194 kgf*cm, 14 ft.*lbf)
NOTICE:
Tighten the bolts in the order sho ...
On-vehicle inspection
1. INSPECT BRAKE BOOSTER
(a) Air tightness check.
(1) Start the engine and stop it after 1 or 2 minutes.
Depress the brake pedal several times slowly.
HINT:
If the pedal goes down farthest at the 1st time,
and gradually rises at the 2nd or 3rd time, the
booster is airtight.
(2) Depre ...
Installation with LATCH system (third seat)
Manual seat
Fold the seatback while pulling
the strap. Return the seatback
and secure it at the 1st lock
position (most upright position).
Adjust the seatback to the
11th lock position.
1st lock position
11th lock position
Power seat
Fold down the seatb ...
