Toyota Sienna Service Manual: No. 2 Ultrasonic sensor
COMPONENTS
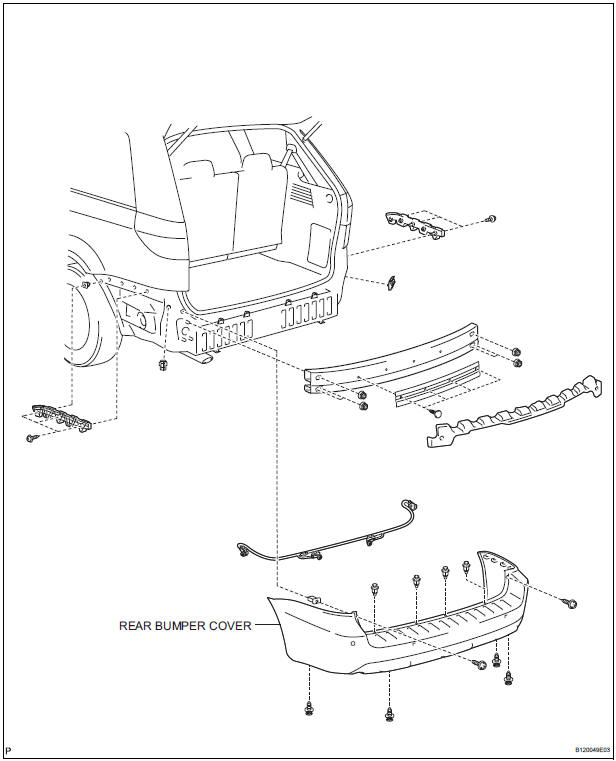
REMOVAL
1. REMOVE REAR BUMPER COVER (2)
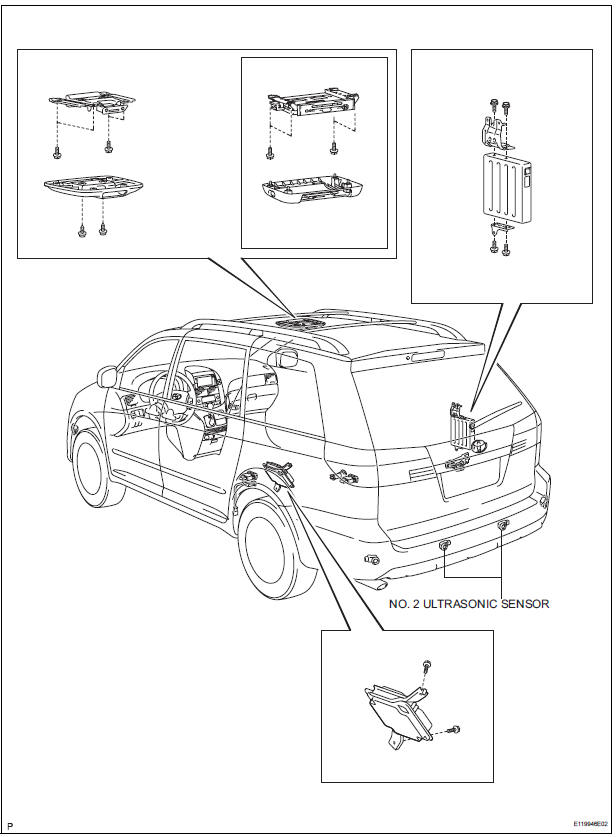
2. REMOVE NO. 1 ULTRASONIC SENSOR RETAINER
- Remove the No. 1 ultrasonic sensor retainer as shown in the illustration
3. REMOVE NO. 2 ULTRASONIC SENSOR
- Disconnect the connector and remove the No. 2 ultrasonic sensor
INSPECTION
1. INSPECT NO.2 ULTRASONIC SENSOR
- Measure the resistance according to the value(s) in the table below.
Standard resistance

If the result is not as specified, replace No.2 ultrasonic sensor
INSTALLATION
1. INSTALL NO. 2 ULTRASONIC SENSOR
- Connect the connector and install the No. 2 ultrasonic sensor.
2. INSTALL NO. 1 ULTRASONIC SENSOR RETAINER
- Install the No. 1 ultrasonic sensor retainer.
3. INSTALL REAR BUMPER COVER
 No. 1 Ultrasonic sensor
COMPONENTS
REMOVAL
1. REMOVE FRONT FENDER LINER LH
2. REMOVE FRONT FENDER LINER RH
3. REMOVE FRONT BUMPER COVER
4. REMOVE REAR BUMPER COVER (2)
5. REMOVE NO. 1 ULTRASONIC SENSOR RETAINER
...
 Television camera
COMPONENTS
REMOVAL
1. REMOVE BACK DOOR GARNISH CENTER
HINT:
Back Door:
Power Back Door:
2. REMOVE BACK DOOR SIDE GARNISH LH
HINT:
Back Door:
Pow ...
Other materials:
ECM Power Source Circuit
DESCRIPTION
When the ignition switch is turned to the ON position, the battery voltage is
applied to terminal IGSW of
the ECM. The ECM MREL output signal causes a current to flow to the coil,
closing the contacts of the EFI
relay and supplying power to terminal +B of the ECM.
If the igniti ...
Fuel Pump Control Circuit
DESCRIPTION
The FUEL PUMP relay switches the fuel pump speed according to the engine
conditions. The fuel pump
operates when the ECM receives the starter-operating signal (STA) and
crankshaft-rotating signal (NE).
The FUEL PUMP relay is turned ON while the engine is idling or operating at l ...
Low Battery Positive Voltage
DTC C1241/41 Low Battery Positive Voltage
DESCRIPTION
WIRING DIAGRAM
INSPECTION PROCEDURE
1 INSPECT ECU-IG FUSE
(a) Remove the ECU-IG fuse from the driver side J/B.
(b) Check continuity of the ECU-IG fuse.
Standard resistance
2 CHECK BATTERY
(a) Check the positive battery volt ...
