Toyota Sienna Service Manual: Oil and oil filter
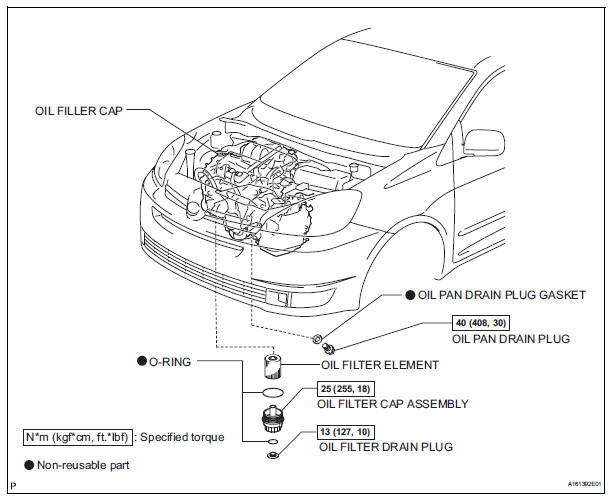
COMPONENTS
REPLACEMENT
CAUTION:
|
1. DRAIN ENGINE OIL
(a) Remove the oil filler cap.
(b) Remove the oil drain plug, and drain the oil into a container.
(c) Clean and install the oil drain plug with a new gasket.
Torque: 40 N*m (408 kgf*cm, 30 ft.*lbf)
2. REMOVE OIL FILTER ELEMENT
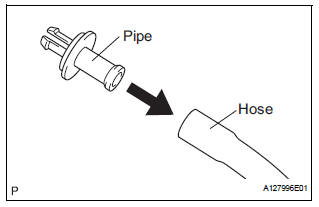
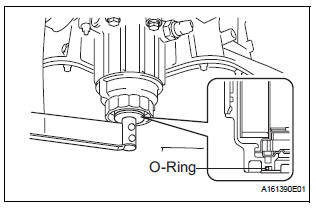
(a) Connect the hose with an inside diameter of 15 mm (0.59 in.) to the pipe.

(b) Remove the oil filter drain plug from the oil filter cap.
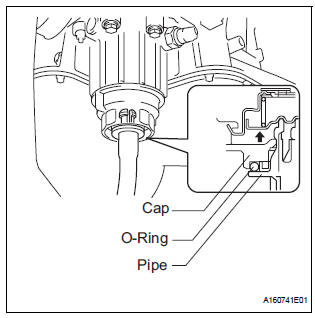
(c) Insert the pipe with the hose into the oil filter cap.
| NOTICE: Be sure to insert the pipe with the O-ring installed on the oil filter cap side. |
HINT: Place the hose end into a container before draining oil from the hose.
(d) Make sure that oil is completely drained, and remove the pipe and O-ring.
HINT: Be sure to turn the pipe in the direction of the arrow to remove it.
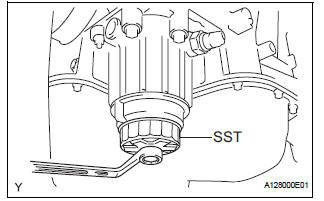
(e) Using SST, remove the oil filter cap.
SST 09228-06501
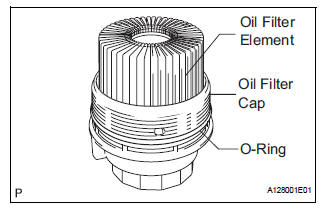
(f) Remove the oil filter element and O-ring from the oil filter cap.
| NOTICE:
Do not use any tools to remove the O-ring in
order to prevent the cap from being damaged.
Be sure to remove it by hand. |
3. INSTALL OIL FILTER ELEMENT
(a) Clean the inside of the oil filter cap, threads, and Oring groove.
(b) Apply a light coat of engine oil to a new O-ring and install it to the oil filter cap.
| NOTICE: Make sure that the O-ring does not get twisted on the groove. |
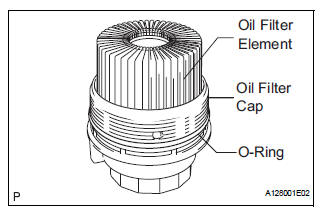
(c) Install a new oil filter element to the oil filter cap.
(d) Remove all dirt and foreign matter from the installation surface and the inside of the cap on the engine side.
(e) Apply a light coat of engine oil to the O-ring again and install the oil filter cap.
| NOTICE: Make sure that the O-ring does not get caught between the parts. |
(f) Using SST, install the oil filter cap.
SST 09228-06501
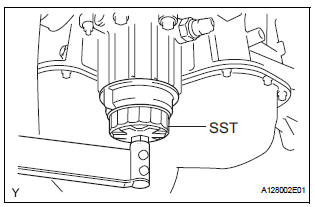
Torque: 25 N*m (255 kgf*cm, 18 ft.*lbf)
| NOTICE: Make sure that there is no clearance between the parts after tightening the oil filter cap. |
(g) Apply a light coat of engine oil to a new O-ring and install it to the oil filter cap.
| NOTICE: Remove all dirt and foreign matter from the installation surface. |
(h) Install the oil filter drain plug to the oil filter cap.
Torque: 13 N*m (127 kgf*cm, 10 ft.*lbf)
| NOTICE: Make sure that the O-ring does not get caught between the parts. |
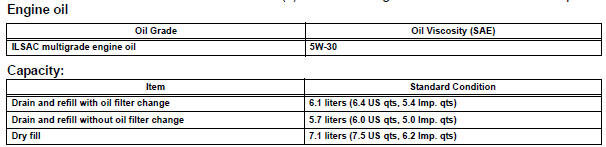
4. ADD ENGINE OIL
(a) Add clean engine oil and install the oil filler cap.
5. INSPECT FOR OIL LEAK
(a) Start the engine. Check for engine oil leaks from the connected parts of the oil filter cap and oil filter drain plug.
 Lubrication system
On-vehicle inspection
1. CHECK ENGINE OIL LEVEL
(a) Warm up the engine, stop it and wait 5 minutes. The
oil level should be between the dipstick's low level
mark and full level mark.
If the eng ...
 Oil pump
Components
...
Other materials:
Power Seat Motor Circuit
DESCRIPTION
When the power seat control switch is operated, a command signal is sent to
the position control ECU
and switch assembly (power seat control switch and ECU). The front power seat
switch then controls the
appropriate seat motor as needed. This memory system does not use a seat
po ...
Clearance Warning ECU Power Source Circuit
DESCRIPTION
This circuit provides power to the clearance warning ECU.
WIRING DIAGRAM
INSPECTION PROCEDURE
1 CHECK HARNESS AND CONNECTOR (CLEARANCE WARNING ECU - AIR CONDITIONER
AMPLIFIER)
Disconnect the connectors from the clearance warning
ECU C9 and air conditioner amplifier con ...
When towing full-time 4wd vehicles
Use one of the methods shown below to tow the
vehicle.
If the vehicle has trouble with the chassis or drive
train, use method 1 (flat bed truck).
WHEN TOWING FULL-TIME 4WD VEHICLES
NOTICE: Do not use any towing method other than those shown above.
The towing methods shown b ...
