Toyota Sienna Service Manual: On-vehicle inspection
1. INSPECT REAR AXLE HUB BEARING BACKLASH
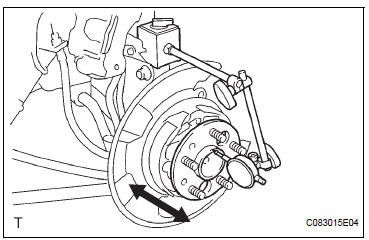
(a) Using a dial gauge, check for backlash near the center of the axle hub.
Maximum: 0.05 mm (0.0020 in.)
If backlash exceeds the maximum, replace the axle hub assembly.
NOTICE: Ensure that the dial gauge is set at right angles to the measurement surface.
2. INSPECT REAR AXLE HUB BEARING DEVIATION
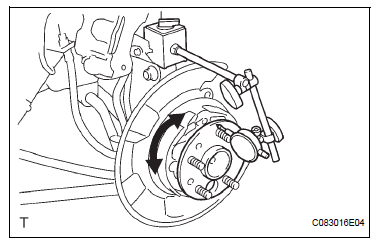
(a) Using a dial gauge, check for deviation in the surface of the axle hub outside the hub bolt.
Maximum: 0.07 mm (0.0027 in.)
If backlash exceeds the maximum, replace the axle hub assembly.
NOTICE: Ensure that the dial gauge is set at right angles to the measurement surface.
 Rear axle hub and bearing (for 4wd)
COMPONENTS
...
 Removal
HINT:
Replace the RH side by the same procedures as the LH side.
1. REMOVE REAR WHEEL
2. REMOVE REAR AXLE SHAFT LH NUT (See page DS-
22)
3. SEPARATE REAR DISC BRAKE CALIPER
ASSEMBLY LH
(a) Remo ...
Other materials:
Perform zero point calibration of yaw rate and deceleration sensor (when
using intelligent tester)
(a) Connect the intelligent tester to the DLC3.
(b) Turn the ignition switch to the ON position.
(c) Operate the intelligent tester to erase the codes
(select "RESET MEMORY").
HINT:
Refer to the intelligent tester operator's manual for
further details.
(d) Using the intell ...
Fail-safe chart
1. FAIL-SAFE FUNCTION
When communication fails in any of the main wires
(communication lines) due to a short circuit or other
causes, the fail-safe function, which is specified for
each system, operates to prevent the system from
malfunctioning.
The table below shows the effects on eac ...
Open in Front Pretensioner Squib RH Circuit
DTC B0131/64 Open in Front Pretensioner Squib RH Circuit
DESCRIPTION
The front pretensioner squib RH circuit consists of the center airbag sensor
assembly and the front seat
outer belt assembly RH.
This circuit instructs the SRS to deploy when deployment conditions are met.
DTC B0131/64 i ...
