Toyota Sienna Service Manual: Power Source Circuit
DESCRIPTION
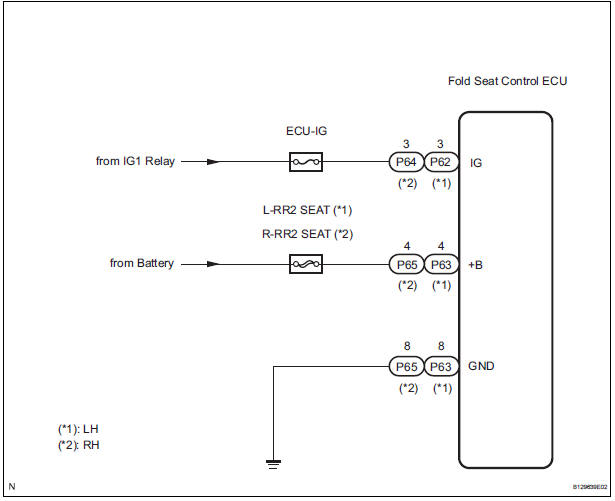
Power is supplied to the fold seat control ECU through the L-RR2 SEAT and R-RR2 SEAT fuses.
WIRING DIAGRAM
INSPECTION PROCEDURE
1 INSPECT FUSE (L-RR2 SEAT, R-RR2 SEAT)
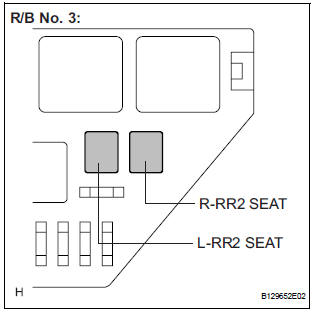
- Remove the fuses from the R/B No. 3.
- Measure the resistance according to the value(s) in the table below.
Standard resistance

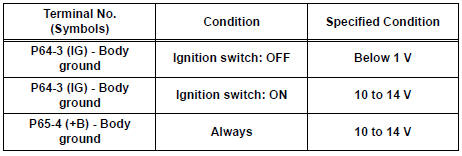
2 CHECK HARNESS AND CONNECTOR (POWER SOURCE)
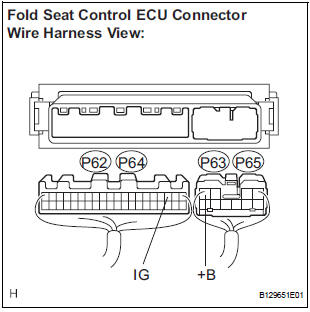
- Remove the fold seat control ECU.
- Disconnect the connectors from the fold seat control ECU.
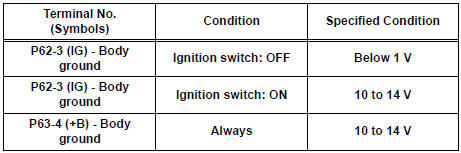
- Measure the voltage according to the value(s) in the table below.
Standard voltage: LH side
RH side
3 CHECK HARNESS AND CONNECTOR (GROUND)
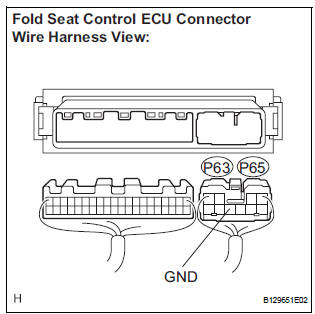
- Measure the resistance according to the value(s) in the table below.
Standard resistance: LH side

RH side

PROCEED TO NEXT CIRCUIT INSPECTION SHOWN IN PROBLEM SYMPTOMS TABLE
 Indicator Circuit
DESCRIPTION
This system has two indicator lights. One of the indicator lights is built
into the fold seat switch. This
indicator light receives power from the fold seat control ECU. It comes on or ...
 Fold Seat Switch Circuit
DESCRIPTION
When the fold seat switch is operated, a switch operation signal is sent to
the fold seat control ECU. The
ECU receives switch operation signals from each switch and activates the fold ...
Other materials:
Reassembly
1. INSTALL REAR SEAT STAY SUB-ASSEMBLY
Install the rear seat stay sub-assembly with the nut.
Torque: 5.5 N*m (56 kgf*cm, 49 in.*lbf)
2. INSTALL NO. 2 SEAT CUSHION SPRING ASSEMBLY
LH
3. INSTALL LOCUS CABLE LH
Install the locus cable LH with the nut.
Torque: 5.5 N*m (56 kg ...
Installation
1. INSTALL ROOF DRIP SIDE FINISH MOULDING
When exchanging the clips
Remove the tape that remains on the mounting
surface of the vehicle body and then clean the
surface with white gasoline.
Using a heat light, heat up the clip installation
surfaces of the vehicle body and moulding.
...
Removal
1. REMOVE ENGINE ASSEMBLY WITH TRANSAXLE
HINT:
See page EM-26
2. REMOVE OIL LEVEL GAUGE GUIDE SUBASSEMBLY
(See page EM-39)
3. REMOVE NO. 1 OIL PIPE (See page EM-77)
4. REMOVE OIL PIPE (See page EM-77)
5. REMOVE CRANKSHAFT PULLEY (See page EM-79)
6. SEPARATE OIL COOLER PIPE
(a) Remove th ...
