Toyota Sienna Service Manual: Power window master switch
Inspection
1. INSPECT POWER WINDOW REGULATOR MASTER SWITCH ASSEMBLY (w/ Jam Protection Function)
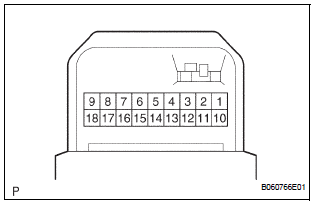
- Check the resistance between the terminals of the switch when the switch is operated.
Standard: AUTO (driver side) switch

Passenger side switch

Rear LH switch
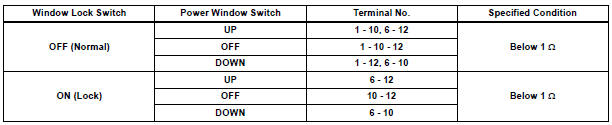
Rear RH switch
If the result is not as specified, replace the switch assembly.
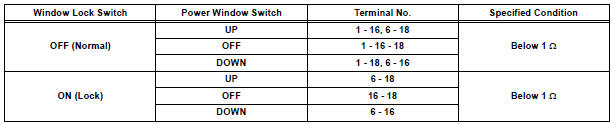
2. INSPECT POWER WINDOW REGULATOR MASTER SWITCH ASSEMBLY (w/o Jam Protection Function)
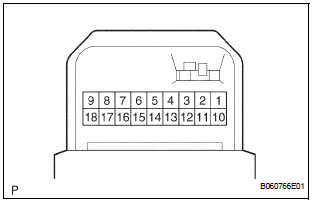
- Check the resistance between the terminals of the switch when the switch is operated.
Standard: AUTO (driver side) switch

Passenger side switch

Rear LH switch
Rear RH switch

If the result is not as specified, replace the switch assembly.
 Problem symptoms table
POWER WINDOW CONTROL SYSTEM (W/O JAM PROTECTION)
Symptom
Suspected Area
All power windows do not operate
PWR fuse
Power window relay (Marking: P/W)
Ig ...
 Front passenger side power
window switch
Front passenger side power
window switch
Inspection
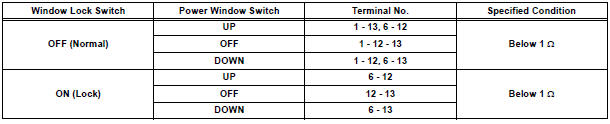
1. INSPECT POWER WINDOW REGULATOR SWITCH ASSEMBLY
Check the resistance between the switch terminals
when the switch is operated.
Standard
If the result is not as spec ...
Other materials:
Installation
1. INSTALL TRANSAXLE HOUSING OIL SEAL
(a) Using SST and a hammer, install a new oil seal.
SST 09316-60011 (09316-00011)
Oil seal installation depth:
-0.5 to 0.5 mm (-0.020 to 0.020 in.)
(b) Coat the lip of the oil seal with MP grease.
2. INSTALL DIFFERENTIAL SIDE BEARING RETAINER OIL SEA ...
Park / Neutral Position Switch Circuit
DESCRIPTION
The clearance warning ECU receives the reverse or park position signal from
the park / neutral position
switch.
WIRING DIAGRAM
INSPECTION PROCEDURE
1 INSPECT CLEARANCE WARNING ECU
Disconnect the C9 connector from the clearance warning
ECU.
Measure the voltage ...
Disassembly
1. REMOVE MAGNETIC CLUTCH ASSEMBLY
(a) Place the compressor and magnetic clutch in a vise.
(b) Using locking pliers, hold the magnetic clutch hub.
(c) Remove the bolt, magnetic clutch hub, and
magnetic clutch washers.
HINT:
There is no set number of magnetic clutch washers
because the ...
