Toyota Sienna 2010-2026 Owners Manual: Programming the HomeLinkÂź (for U.S.A. owners)
The HomeLinkÂź compatible transceiver in your vehicle has 3 buttons which can be programmed to operate 3 different devices. Refer to the programming method below appropriate for the device.
- Indicator light
- Buttons
Programming the HomeLinkÂź

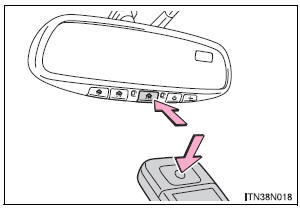
- Point the remote control for
the device 1 to 3 in. (25 to 75
mm) from the HomeLinkÂź
control buttons.
Keep the indicator light on the HomeLinkÂź in view while programming
- Press and hold one of the
HomeLinkÂź buttons and the
transmitter button. When the
HomeLinkÂź indicator light
changes from a slow to a
rapid flash, you can release
both buttons.
If the HomeLinkÂź indicator light comes on but does not flash, or flashes rapidly for 2 seconds and remains lit, the HomeLinkÂź button is already programmed.
Use the other buttons or follow the âReprogramming a HomeLinkÂź buttonâ instructions.
- Test the operation of the
HomeLinkÂź by pressing the
newly programmed button.
If programming a garage door opener, check to see if the garage door opens and closes.
If the garage door does not operate, see if your garage transmitter is of the Rolling Code type. Press and hold the programmed HomeLinkÂź button.
The garage door has the rolling code feature if the indicator light (on the HomeLinkÂź) flashes rapidly for 2 seconds and then remains lit. If your transmitter is the Rolling Code type, proceed to the heading âProgramming a rolling code systemâ.
- Repeat the steps above to program another device for each of the remaining HomeLinkÂź buttons.
Programming a Rolling Code system (for U.S.A. owners)
If your device is Rolling Code equipped, follow the steps under the heading âProgramming the HomeLinkÂźâ before proceeding with the steps listed below.
- Locate the training button on the ceiling mounted garage door
opener motor. The exact location and color of the button may
vary by brand of garage door opener.
Refer to the operation manual supplied with the garage door opener for the location of the training button.
- Press the training button.
Following this step, you have 30 seconds in which to initiate step 3 below.
- Press and hold the vehicleâs programmed HomeLinkÂź button for
2 seconds and release it. Repeat this step once again. The
garage door may open.
If the garage door opens, the programming process is complete. If the door does not open, press and release the button a third time. This third press and release will complete the programming process by opening the garage door.
The ceiling mounted garage door opener motor should now recognize the HomeLinkÂź transceiver and operate the garage door.
- Repeat the steps above to program another rolling code system for any of the remaining HomeLinkÂź buttons.
Programming an entry gate (for U.S.A. owners)/Programming all devices in the Canadian market
- Place your transmitter 1 to 3 in. (25 to 75 mm) away from the surface
of the HomeLinkÂź.
Keep the indicator light on the HomeLinkÂź in view while programming.
- Press and hold the selected HomeLinkÂź button.
- Repeatedly press and release (cycle) the deviceâs remote control button for two seconds each until step 4 is complete.
- When the indicator light on the HomeLinkÂź compatible transceiver starts to flashing rapidly, release the buttons.
- Test the operation of the HomeLinkÂź by pressing the newly programmed button. Check to see if the gate/device operates correctly.
- Repeat the steps above to program another device for each of the remaining HomeLinkÂź buttons.
Programming other devices To program other devices such as home security systems, home door locks or lighting, contact your authorized Toyota dealer for assistance.
Reprogramming a button
The individual HomeLinkÂź buttons cannot be erased but can be reprogrammed. To reprogram a button, follow the programming instructions.
 Garage door opener
The garage door opener can be programmed to operate garage
doors, gates, entry doors, door locks, home lighting systems,
security systems, and other devices
The garage door opener (HomeLinkÂź Unive ...
 Operating the HomeLink
Press the appropriate HomeLinkÂź button. The HomeLinkÂź indicator
light on the HomeLinkÂź transceiver should turn on.
The HomeLinkÂź continues to send a signal for up to 20 seconds as long as
the ...
Other materials:
How to proceed with
troubleshooting
HINT:
Troubleshoot in accordance with the procedures on the
following pages.
1 VEHICLE BROUGHT TO WORKSHOP
2 CUSTOMER PROBLEM ANALYSIS CHECK AND SYMPTOM CHECK
3 INSPECT COMMUNICATION FUNCTION OF LARGE-SCALE MULTIPLEX
COMMUNICATION SYSTEM (BEAN)
Use the intelligent tester to check for norma ...
Removal
1. REMOVE REAR WHEEL
2. REMOVE EXHAUST PIPE ASSEMBLY
HINT:
Perform this procedure only when removing the RH side.
(See page EX-8)
3. REMOVE REAR SPEED SENSOR LH
HINT:
(See page DS-21)
4. REMOVE REAR AXLE SHAFT NUT LH
HINT:
(See page DS-21)
5. REMOVE REAR DRIVE SHAFT ASSEMBLY LH
HINT:
...
Registering a BluetoothÂź
audio player for the
first time
To use the BluetoothÂź Audio, it is necessary to register an audio
player with the system.
Once the player has been registered, it is possible to use the
BluetoothÂź Audio.
For details about registering a BluetoothÂź device
Turn the BluetoothÂź connection setting of your audio player on ...
