
Toyota Sienna Service Manual: Rear Air Conditioning Control Panel Circuit
DESCRIPTION
This is the rear A/C system control signal circuit as well as the power supply circuit of the rear A/C control assembly.
Pulse signals regarding rear A/C control panel switch operation are transmitted between the A/C amplifier and rear A/C control assembly.
WIRING DIAGRAM
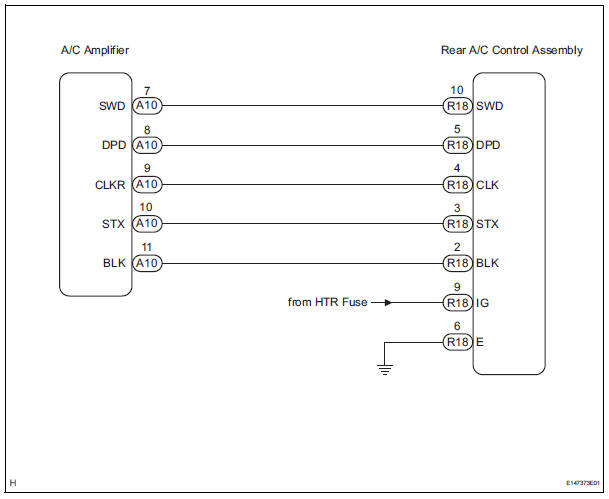
INSPECTION PROCEDURE
1 CHECK HARNESS AND CONNECTOR (REAR A/C CONTROL ASSEMBLY - BATTERY)

(a) Disconnect the connector from the rear A/C control assembly.
(b) Measure the voltage according to the value(s) in the table below.
Standard voltage


2 CHECK HARNESS AND CONNECTOR (REAR A/C CONTROL ASSEMBLY - BODY GROUND)

(a) Measure the resistance according to the value(s) in the table below.
Standard resistance 


3 CHECK HARNESS AND CONNECTOR (REAR A/C CONTROL ASSEMBLY - A/C AMPLIFIER)
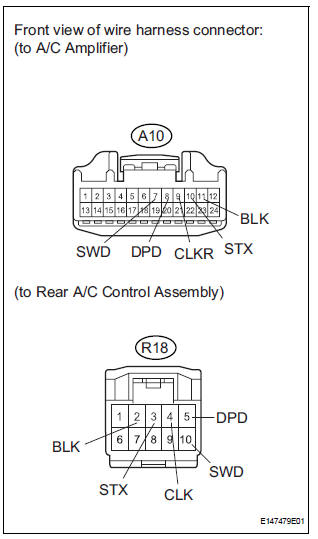
(a) Disconnect the connector from the A/C amplifier.
(b) Measure the resistance according to the value(s) in the table below.
Standard resistance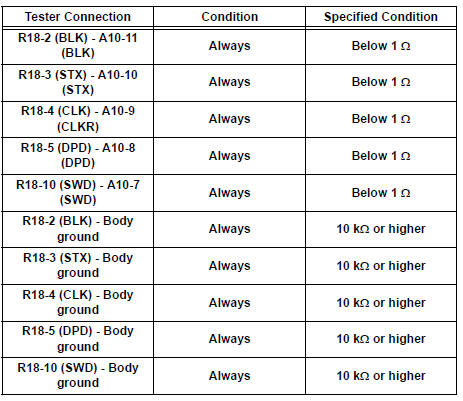


PROCEED TO NEXT CIRCUIT INSPECTION SHOWN IN PROBLEM SYMPTOMS TABLE
 Air Conditioning Compressor Magnetic Clutch Circuit
DESCRIPTION
When the A/C amplifier is turned on, a magnetic clutch ON signal is sent from
the MGC terminal of the A/
C amplifier. Then, the MG CLT relay turns on to operate the magnetic clutch.
W ...
 Rear Air Conditioning Relay Circuit
DESCRIPTION
The RR A/C relay is switched on by signals from the A/C amplifier. It
supplies power to the rear blower
motor.
WIRING DIAGRAM
INSPECTION PROCEDURE
1 INSPECT RELAY (RR A/C)
...
Other materials:
On-vehicle inspection
1. INSPECT CENTER AIRBAG SENSOR ASSEMBLY
(VEHICLE NOT INVOLVED IN COLLISION)
Perform a diagnosis system check.
2. INSPECT CENTER AIRBAG SENSOR ASSEMBLY
(VEHICLE INVOLVED IN COLLISION AND AIRBAG
HAS NOT DEPLOYED)
Perform a diagnosis system check.
3. INSPECT CENTER AIRBAG ...
Installation
1. INSTALL CAMSHAFT TIMING OIL CONTROL VALVE ASSEMBLY (for Bank 2 Exhaust
Side)
Apply a light coat of engine oil to the new O-ring and
install it to the camshaft timing oil control valve.
Install the camshaft timing oil control valve
assembly with the bolt.
Torque: 10 N ...
Problem symptoms table
Proceed to the reference page shown in the table below for
each malfunction symptom and troubleshoot each circuit.
HINT:
Troubleshooting of the theft deterrent system is based on the
premise that the door lock control system and the wireless
door lock control system are operating normally. Ac ...
