Toyota Sienna Service Manual: Rear axle hub bolt
COMPONENTS
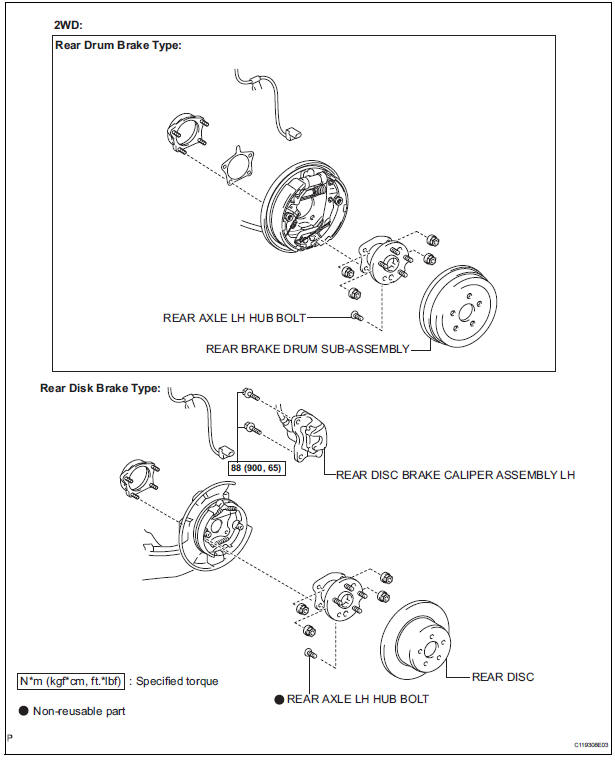
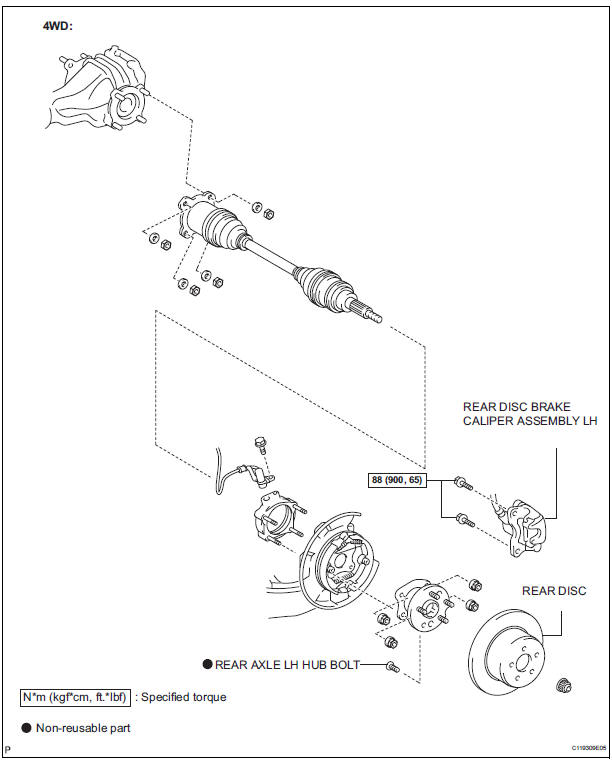
Replacement
HINT: Replace the RH side using the same procedures as for the LH side.
1. REMOVE REAR WHEEL
2. SEPARATE REAR DISC BRAKE CALIPER ASSEMBLY LH
(a) Separate rear disc brake caliper assembly LH for 2WD and disk rear brake type (See page AH-16).
3. SEPARATE REAR DISC BRAKE CALIPER ASSEMBLY LH
(a) Separate rear disc brake caliper assembly LH for 4WD and disk rear brake type (See page AH-19).
4. REMOVE REAR DISC
(a) Remove rear disc for disk rear brake type.
5. REMOVE REAR BRAKE DRUM SUB-ASSEMBLY
(a) Remove rear brake drum sub-assembly for drum rear brake type.
6. REMOVE REAR AXLE LH HUB BOLT
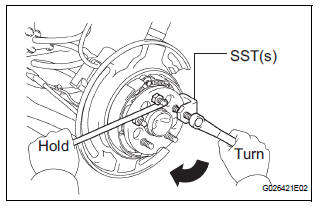
(a) Temporarily install the 2 nuts and washers to the rear axle LH hub bolt as shown in the illustration.
(b) Using SST(s) and a hammer handle or an equivalent to hold the hub & bearing assembly, remove the rear axle LH hub bolt.
SST 09628-10011
7. INSTALL REAR AXLE LH HUB BOLT
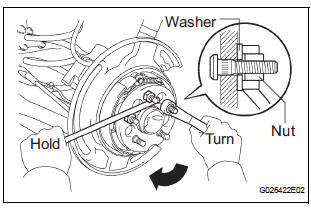
(a) Install a washer and nut to a new bolt, as shown in the illustration.
(b) Using a hammer handle or an equivalent to hold the hub & bearing assembly, install the rear axle LH hub bolt by tightening the nut.
8. INSTALL REAR DISC
(a) Install rear disc for disk rear brake type.
9. INSTALL REAR DISC BRAKE CALIPER ASSEMBLY LH
(a) Install rear disc brake caliper assembly LH for 2WD and disk rear brake type (See page AH-17).
10. INSTALL REAR DISC BRAKE CALIPER ASSEMBLY LH
(a) Install rear disc brake caliper assembly LH for 4WD and disk rear brake type (See page AH-20).
11. INSTALL REAR BRAKE DRUM SUB-ASSEMBLY
(a) Install rear brake drum sub-assembly for drum rear brake type.
12. INSTALL REAR WHEEL Torque: 103 N*m (1,050 kgf*cm, 76 ft.*lbf)
 Installation
1. INSTALL FRONT AXLE ASSEMBLY LH
(a) Install the 2 bolts, nuts and front axle assembly LH
with the 2 bolts and nuts to the shock absorber
assembly front LH.
Torque: 230 N*m (2,350 kgf*cm, 170 ...
 Rear axle hub and bearing (for 2wd)
COMPONENTS
...
Other materials:
Vehicle Speed Signal Error (Test Mode DTC)
DTC C2191/91 Vehicle Speed Signal Error (Test Mode DTC)
DESCRIPTION
The tire pressure warning ECU receives a speed signal from the combination
meter. This DTC is stored
upon entering test mode, and cleared when a vehicle speed signal of 12 mph (20
km/h) is detected for 3
seconds or more. Thi ...
Hood
Release the lock from the inside of the vehicle to open the hood.
Pull the hood lock release lever.
The hood will pop up slightly.
Pull up the auxiliary catch lever
and lift the hood.
Hold the hood open by inserting
the supporting rod into the slot
WARNING ...
Removal
NOTICE:
When installing, coat the parts indicated by the arrows
with power steering fluid or molybdenum disulfide
lithium base grease (See page PS-21).
1. INSPECT CENTER FRONT WHEEL
2. REMOVE FRONT WHEEL
3. SEPARATE TIE ROD ASSEMBLY LH
SST 09628-62011
4. SEPARATE TIE ROD ASSEMBLY RH
SST 096 ...
