Toyota Sienna Service Manual: Rear blower resistor
ON-VEHICLE INSPECTION
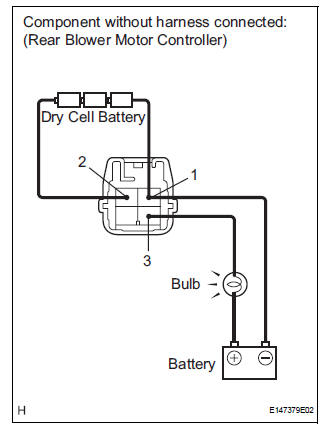
1. INSPECT REAR BLOWER MOTOR CONTROLLER

(a) Measure resistance according to the value(s) in the table below..
Standard resistance 
If the resistance is not as specified, replace the rear blower motor controller.
(b) Inspect the rear blower motor controller.
(1) Connect the positive (+) lead to terminal 3 through a 12 V to 3.4 W test bulb and negative (-) lead to terminal 1.
(2) Connect the three 1.5 V dry cell batteries' positive (+) lead to terminal 2, and the negative (-) lead to terminal 1. Then check that the test bulb comes on.
OK: The test bulb comes on.
If operation is not as specified, replace the rear blower motor controller.
 For rear air conditioning system
ON-VEHICLE INSPECTION
1. INSPECT REAR AIR MIX CONTROL SERVO MOTOR
(a) Inspect servo motor operation.
(1) Connect the positive (+) lead from the battery
to terminal 4 and negative (-) lead to ...
 Compressor and magnetic clutch
COMPONENTS
...
Other materials:
Reassembly
1. INSTALL NO. 2 SEAT LEG SUB-ASSEMBLY
Install the No. 2 seat leg sub-assembly with the 3
bolts and nut.
Torque: 19 N*m (194 kgf*cm, 14 ft.*lbf)
NOTICE:
Tighten the bolts and nuts in the order shown in
the illustration.
Install the 3 clamps.
2. INSTALL NO. 2 SEAT ...
Installation
1. INSTALL BRAKE ACTUATOR
NOTICE:
Do not remove the hole plugs before connecting the
brake tubes. New actuators are filled with brake
fluid.
(a) Install the brake actuator assembly with the 2 nuts.
Torque: 5.4 N*m (55 kgf*cm, 48 in.*lbf)
2. INSTALL BRAKE ACTUATOR WITH BRACKET
(a) Insta ...
Short in Driver Side Squib 2nd Step Circuit
DTC B1180/17 Short in Driver Side Squib 2nd Step Circuit
DESCRIPTION
The driver side squib 2nd step circuit consists of the center airbag sensor
assembly, the spiral cable and
the steering pad.
The circuit instructs the SRS to deploy when deployment conditions are met.
DTC B1180/17 is rec ...
