Toyota Sienna Service Manual: Reassembly
1. INSTALL PARKING BRAKE SWITCH ASSEMBLY
(a) Install the parking brake switch to the parking brake pedal with the screw.
2. INSTALL PARKING BRAKE CABLE ASSEMBLY NO.1
(a) Connect the parking brake cable No. 1 to the parking brake cable equalizer.
(b) Install the parking brake cable No. 1 with the 6 bolts.
(Except 7 Passenger Type) (c) Install the parking brake cable No. 1 with the 7 bolts.
(7 Passenger Type)
Torque: Bolt (A) 5.6 N*m (57 kgf*cm, 50 in.*lbf) Bolt (B) 8 N*m (82 kgf*cm, 71 in.*lbf)
3. INSTALL PARKING BRAKE PEDAL BRACKET PROTECTOR
(a) Fit the convex part on a new parking brake pedal bracket protector into the concave part on the parking brake control pedal and turn the parking brake pedal bracket protector counterclockwise.
(b) Engaging the 2 claws, install the parking brake pedal bracket to the parking brake control pedal.
 Disassembly
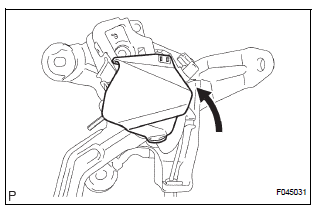
1. REMOVE PARKING BRAKE PEDAL BRACKET PROTECTOR
(a) Using a flat-head screwdriver, disengage the 2
claws on the parking brake pedal bracket protector.
(b) Turning the parking brake pedal br ...
 Installation
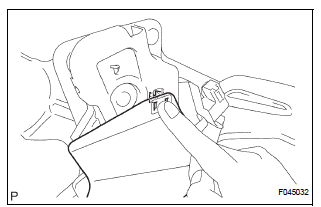
1. INSTALL PARKING BRAKE CONTROL PEDAL ASSEMBLY
(a) Install the parking brake control pedal assembly with
a bolt and the 2 nuts.
Torque: 39 N*m (398 kgf*cm, 29 ft.*lbf)
(b) Connect the parki ...
Other materials:
A/F Sensor Circuit Slow Response
DTC P2A00 A/F Sensor Circuit Slow Response (Bank 1
Sensor 1)
DTC P2A03 A/F Sensor Circuit Slow Response (Bank 2
Sensor 1)
HINT:
DTC P2A00 indicates malfunctions related to the bank 1 A/F sensor.
DTC P2A03 indicates malfunctions related to the bank 2 A/F sensor.
Bank 1 r ...
Using a flatbed truck
If you use chains or cables to tie
down your vehicle, the angles
shaded in black must be 45.
Do not overly tighten the tie
downs or the vehicle may be damaged.
WARNINGObserve the following precautions.
Failure to do so may result in death or serious injury.
When tow ...
EVAP System
RELATED DTCS
If any EVAP system DTCs are set, the malfunctioning area can be determined
using the table below.
NOTICE:
If the 0.02 inch reference pressure difference between the first and second
checks is greater than
the specification, the DTCs corresponding to the reference pressur ...
