Toyota Sienna Service Manual: Reassembly
1. APPLY HIGH TEMPERATURE GREASE
(a) Apply the high temperature grease to the surface on which the shoe and backing plate attach.
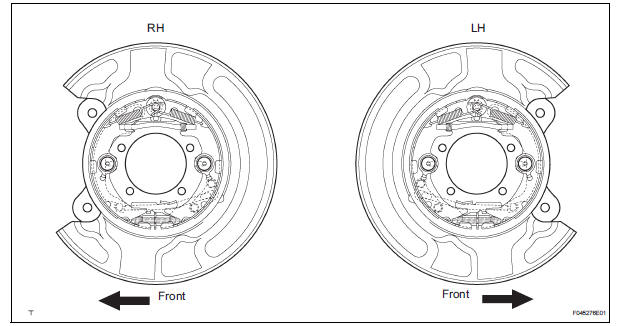
2. INSTALL PARKING BRAKE SHOE LEVER LH
(a) Install the shoe lever and shim to the rear shoe with a new C-washer.
(b) Using a feeler gauge, measure the clearance.
Standard clearance: Less than 0.35 mm (0.0138 in.)
If the clearance is not within the specification,
replace the shim with one of the correct size.

(c) Install the correct side shim with a new C-washer.
(d) Remeasure the clearance.
3. INSTALL PARKING BRAKE SHOE ASSEMBLY LH NO.2
(a) Using needle-nose pliers, connect the parking brake cable No. 3 to the parking brake shoe lever.
(b) Install the parking brake shoe assembly LH No. 2 with the shoe hold-down compression spring pin No. 2, shoe hold-down compression spring and 2 cups.
4. INSTALL PARKING BRAKE SHOE ADJUSTING SCREW SET
(a) Apply the high temperature grease to the adjusting bolt.
(b) Install the parking brake shoe adjusting screw set LH.
5. INSTALL PARKING BRAKE SHOE STRUT LH
6. INSTALL PARKING BRAKE SHOE ASSEMBLY LH NO.1
(a) Install the parking brake shoe assembly LH No. 1 with the shoe hold-down compression spring pin No. 1, shoe hold-down compression spring and 2 cups.
(b) Install the tension spring and 2 shoe return tension springs.
7. CHECK PARKING BRAKE INSTALLATION
(a) Check that each part is installed properly.
NOTICE: No oil or grease should be adhered to the friction surface of the shoe lining and disc.
8. INSTALL REAR DISC
9. ADJUST PARKING BRAKE SHOE CLEARANCE
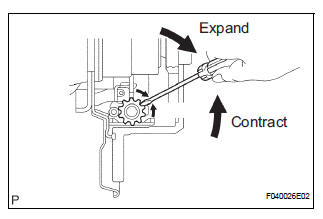
(a) Temporarily install the hub nuts.
(b) Remove the hole plug, and turn the adjuster and expand the shoes until the disc locks.
(c) Contract the shoe adjuster until the disc can rotate smoothly.
Standard: Return 8 notches
(d) Check that the brake disc rotates smoothly.
(e) Install the hole plug.
10. CONNECT REAR DISC BRAKE CALIPER ASSEMBLY LH
11. INSTALL REAR WHEEL Torque: 103 N*m (1,050 kgf*cm, 76 ft.*lbf)
12. INSPECT PARKING BRAKE PEDAL TRAVEL (See page PB-1)
13. ADJUST PARKING BRAKE PEDAL TRAVEL (See page PB-1)
 Inspection
1. INSPECT BRAKE DISC INSIDE DIAMETER
(a) Using a brake drum gauge or equivalent, measure
the inside diameter of the disc.
Standard inside diameter:
190 mm (7.480 in.)
Maximum inside diameter ...
Other materials:
Installation
1. INSTALL FRONT SEAT ASSEMBLY RH
Place the seat assembly in the cabin.
NOTICE:
Be careful not to damage the body.
Connect the connectors under the seat assembly.
Tighten the 2 bolts on the front side of the seat
assembly.
Torque: 37 N*m (375 kgf*cm, 27 ft.*lbf)
...
Installation
1. Install purge vsv
(A) install the purge vsv with the bolt.
Torque: 10 n*m (102 kgf*cm, 7 ft.*Lbf)
(B) connect the 2 vacuum hoses and no. 1 Vacuum
switching valve connector.
2. INSTALL V-BANK COVER SUB-ASSEMBLY (See
page EM-63)
3. CONNECT CABLE TO NEGATIVE BATTERY
TERMINAL ...
Problem symptoms table
HINT:
Use the table below to help determine the cause of the
problem symptom. The potential causes of the symptoms are
listed in order of probability in the "Suspected Area" column
of the table. Check each symptom by checking the suspected
areas in the order they are listed. Replace p ...
