Toyota Sienna Service Manual: Reassembly
1. INSTALL HEATER RADIATOR UNIT SUB-ASSEMBLY
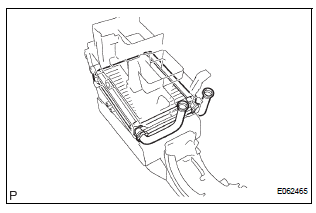
(a) Install the heater radiator unit sub-assembly to the air conditioning blower assembly.
(b) Install the 2 O-rings to the heater water valve assembly.

(c) Install the 3 screws and the heater water valve assembly.
(d) Install the 2 screws and the 2 clamps.

(e) Engage the claw fitting and install the 3 screws and blower case.
2. INSTALL BLOWER RESISTOR TRANSISTOR ASSEMBLY
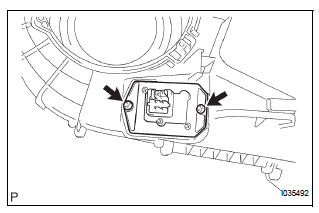
(a) Install the 2 screws and the blower resistor transistor assembly.
3. INSTALL COOLING UNIT MOTOR SUB-ASSEMBLY WITH FAN
(a) Install the 3 screws and the cooling unit motor subassembly w/ fan.
 Disassembly
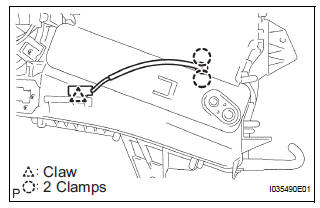
1. REMOVE COOLER THERMISTOR NO.1 (for Automatic Air Conditioning System)
(a) Disengage the 2 claw fittings and the clamp and
remove the cooler thermistor No. 1.
2. REMOVE COOLING UNIT MOTOR SUB ...
 Installation
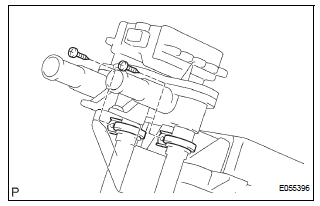
1. INSTALL AIR CONDITIONING BLOWER ASSEMBLY
(a) Install the air conditioning blower assembly with the
3 bolts.
Torque: 5.4 N*m (55 kgf*cm, 48 in.*lbf)
NOTICE:
Tighten the bolts in the order s ...
Other materials:
Calling the message sender
Calls can be made to an e-mail/SMS/MMS message sender’s phone
number.
Display the message inbox screen.
Select the desired message.
Select .
Check that the “Call” screen is displayed.
Calling from a number within a message
Calls can be made to a number identified in a message†...
Readiness monitor drive
pattern
1. PURPOSE OF READINESS TESTS
The On-Board Diagnostic (OBD II) system is
designed to monitor the performance of emissionrelated
components, and indicate any detected
abnormalities with DTCs (Diagnostic Trouble Codes).
Since various components need to be monitored in
different d ...
System check
HINT:
Performing a SYSTEM CHECK enables the system,
which consists of the multiple actuators, to be operated
without removing any parts. In addition, it can show
whether or not any DTCs are set, and can detect
potential malfunctions in the system. The SYSTEM
CHECK can be performed with an inte ...
