Toyota Sienna Service Manual: Reassembly
1. INSTALL REAR SEAT STAY SUB-ASSEMBLY
- Install the rear seat stay sub-assembly with the nut.
Torque: 5.5 N*m (56 kgf*cm, 49 in.*lbf)
2. INSTALL NO. 2 SEAT CUSHION SPRING ASSEMBLY LH
3. INSTALL LOCUS CABLE LH
- Install the locus cable LH with the nut.
Torque: 5.5 N*m (56 kgf*cm, 49 in.*lbf)
4. INSTALL NO. 2 SEAT CUSHION COVER SUBASSEMBLY LH
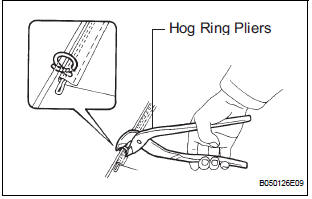
- Using hog ring pliers, install the No. 2 seat cushion cover sub-assembly LH to the seat cushion pad with new hog rings.
NOTICE:
- Be careful not to damage the cover.
- When installing the hog rings, take care to prevent wrinkles as much as possible.
5. INSTALL REAR NO. 2 SEAT INNER BELT ASSEMBLY LH
- Install the rear No. 2 seat inner belt assembly with
the bolt.
Torque: 42 N*m (428 kgf*cm, 31 ft.*lbf)
6. INSTALL REAR SEAT INNER BELT ASSEMBLY LH
- Install the rear seat inner belt assembly with the
bolt.
Torque: 42 N*m (428 kgf*cm, 31 ft.*lbf)
7. INSTALL NO. 2 RECLINING ADJUSTER RELEASE HANDLE LH
- Install the reclining adjuster release handle No. 2 LH
with the nut.
Torque: 5.5 N*m (56 kgf*cm, 49 in.*lbf)
8. INSTALL RECLINING RELEASE HANDLE SUBASSEMBLY LH
- Install the reclining release handle sub-assembly LH
with the nut.
Torque: 5.5 N*m (56 kgf*cm, 49 in.*lbf)
9. INSTALL REAR SEATBACK CONNECTING LH WIRE
- Install the rear seatback connecting LH wire.
10. INSTALL REAR SEAT LOCK RELEASE STRAP ASSEMBLY
- Install the rear seat lock release strap assembly with
the nut.
Torque: 5.5 N*m (56 kgf*cm, 49 in.*lbf)
11. INSTALL NO. 2 SEATBACK COVER LH
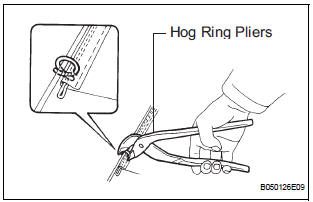
- Using hog ring pliers, install the No. 2 seatback cover LH to the seatback pad with new hog rings.
NOTICE:
- Be careful not to damage the cover.
- When installing the hog rings, take care to prevent wrinkles as much as possible.
- Install the 4 headrest supports.
12. INSTALL NO. 2 SEATBACK LOCK CONTROL BEZEL
- Install the No. 2 seatback lock control bezel with the screw.
13. INSTALL NO. 2 REAR SEAT COVER BEZEL
- Install the No. 2 rear seat cover bezel with 5 screws.
14. INSTALL REAR NO. 2 SEAT LAP BELT ASSEMBLY CENTER WITH INNER LH
- Install the rear No. 2 seat lap belt assembly center
with inner LH with the bolt.
Torque: 42 N*m (428 kgf*cm, 31 ft.*lbf)
15. INSTALL REAR SEATBACK ASSEMBLY LH
- Install the seatback with the 4 bolts.
Torque: 44 N*m (449 kgf*cm, 32 ft.*lbf)
- Connect the rear seat lock release strap cable.
- Connect the reclining remote control cable.
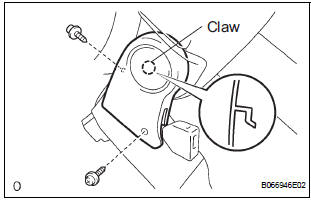
16. INSTALL LH SEAT REAR SEAT RECLINING COVER
- Engage the claw to Install the LH seat rear seat reclining cover with 2 screws.
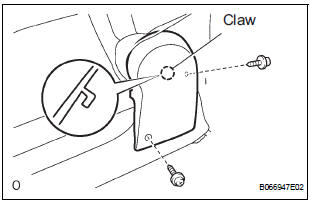
17. INSTALL RH SEAT REAR SEAT RECLINING COVER
- Engage the claw to Install the RH seat rear seat reclining cover with 2 screws.
 Disassembly
1. REMOVE RH SEAT REAR SEAT RECLINING COVER
Remove the 2 screws.
Remove the RH seat rear seat reclining cover by
pulling it out in the arrow mark direction shown in
the illus ...
 Installation
1. INSTALL REAR NO. 2 SEAT ASSEMBLY LH
Place the rear No. 2 seat assembly LH in the cabin.
NOTICE:
Be careful not to damage the body.
Install the rear No. 2 seat assembly LH wi ...
Other materials:
Vanity light
ON-VEHICLE INSPECTION
1. LH VISOR ASSEMBLY
Inspect vanity light resistance.
check that the resistance exists between the
terminal 1 and the terminal 2 when the light is
operated.
Resistance:
OFF (closed):
10 kΩ or higher
ON (opened):
Below 1 Ω
2. RH VISOR ...
Front Occupant Classification Sensor LH Circuit
Malfunction
DTC B1780 Front Occupant Classification Sensor LH Circuit
Malfunction
DESCRIPTION
The front occupant classification sensor LH circuit consists of the occupant
classification ECU and the
front occupant classification sensor LH.
DTC B1780 is recorded when a malfunction is detected in the fron ...
Speaker Circuit
DESCRIPTION
The sound signal that has been amplified by the stereo component amplifier is
sent to the speakers from
the stereo component amplifier through this circuit.
If there is a short in this circuit, the stereo component amplifier detects it
and stops output to the speakers.
Thus s ...
