Toyota Sienna Service Manual: Reassembly
1. INSTALL LOWER RADIATOR GRILLE
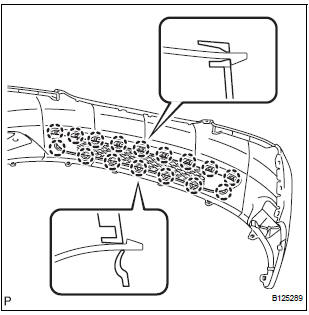
- Engage the 16 claws to install the lower radiator grille to the front bumper cover.
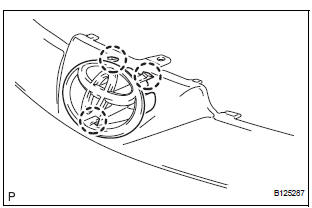
2. INSTALL FRONT BUMPER HOLE COVER LH (w/o Fog Light)
- Engage the 2 pins to install the front bumper hole cover LH to the front bumper cover.
3. INSTALL FRONT BUMPER HOLE COVER RH (w/o Fog Light)
HINT: Perform the same procedure as for the LH side.
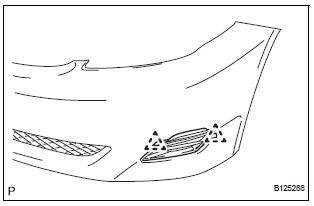
4. INSTALL FOG LIGHT ASSEMBLY LH (w/ Fog Light) (See page LI-85)
5. INSTALL FOG LIGHT ASSEMBLY RH (w/ Fog Light)
HINT: Perform the same procedure as for the LH side.
6. INSTALL FRONT BUMPER EMBLEM
- Engage the 3 claws to install the front bumper emblem to the upper radiator grille.
7. INSTALL UPPER RADIATOR GRILLE
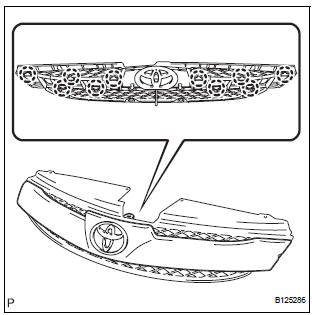
- Engage the 10 claws to install the upper radiator grille to the radiator grille.
8. INSTALL RADIATOR GRILLE

- Engage the 4 claws to install the radiator grille to the front bumper cover.
- Install the 2 bolts and the 2 screws.
Torque: Bolt 5.4 N*m (54 kgf*cm, 48 in.*lbf) Screw 5.0 N*m (51 kgf*cm, 44.3 in.*lbf)
9. INSTALL NO. 1 ULTRASONIC SENSOR (LH side) (w/ Clearance Sonar System) (See page PM-20)
10. INSTALL NO. 1 ULTRASONIC SENSOR (RH side) (w/ Clearance Sonar System)
HINT: Perform the same procedure as for the LH side.
11. INSTALL NO. 1 ULTRASONIC SENSOR RETAINER
12. INSTALL FRONT BUMPER SIDE SUPPORT LH
- Engage the 2 clips to install the front bumper side support LH.
- Install the screw.
Torque: 7.0 N*m (71 kgf*cm, 62.0 in.*lbf)
13. INSTALL FRONT BUMPER SIDE SUPPORT RH
HINT: Perform the same procedure as for the LH side.
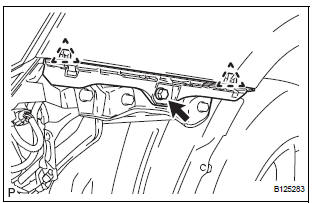
14. INSTALL FRONT BUMPER REINFORCEMENT SUBASSEMBLY
- Install the front bumper reinforcement sub-assembly
with the 6 bolts.
Torque: 50 N*m (510 kgf*cm, 37 ft.*lbf)
15. INSTALL FRONT BUMPER ENERGY ABSORBER
 Disassembly
1. REMOVE FRONT BUMPER ENERGY ABSORBER
2. REMOVE FRONT BUMPER REINFORCEMENT SUBASSEMBLY
Remove the 6 bolts and the front bumper
reinforcement sub-assembly.
3. REMOVE FRONT BUMPER SIDE SU ...
 Installation
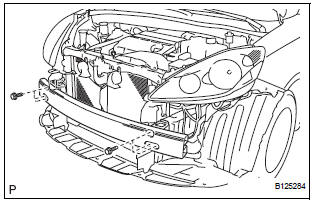
1. INSTALL FRONT BUMPER ASSEMBLY
Push the front bumper onto the front of the vehicle
and engage the claws on the left and right sides of
the front bumper to install it as shown in the
il ...
Other materials:
Diagnosis system
1. DESCRIPTION
When troubleshooting a vehicle with the diagnosis
system, the only difference from the usual
troubleshooting procedure is connecting the
intelligent tester to the vehicle and reading various
data output from the vehicle's clearance warning
ECU.
The clearance warn ...
Repair
1. REPAIR REAR WINDOW DEFOGGER WIRE
Clean the broken wire tips with grease, wax and
silicone remover.
Place the masking tape along the both sides of the
wire.
Thoroughly mix the repair agent (Dupont paste No.
4817).
Using a fine tip brush, apply a smal ...
Oxygen (A/F) Sensor Heater Control Circuit
HINT
Although the DTC titles say the oxygen sensor, these DTCs relate to the
Air-Fuel Ratio (A/F) sensor.
Sensor 1 refers to the sensor mounted in front of the Three-Way
Catalytic Converter (TWC) and
located near the engine assembly.
DESCRIPTION
Refer to DTC P2195 (See page ES- ...
