Toyota Sienna Service Manual: Reassembly
1. INSTALL PLANETARY GEAR
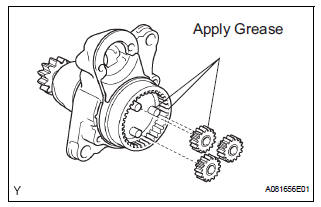
(a) Apply grease to the planetary gears and pin parts of the planetary shaft.
(b) Install the 3 planetary gears.
2. INSTALL STARTER ARMATURE ASSEMBLY
(a) Apply grease to the plate washer and the armature shaft.
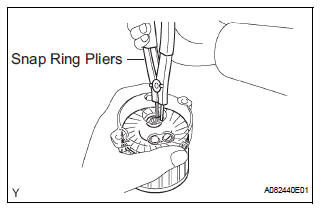
(b) Install the starter armature to the starter commutator end frame.
(c) Using snap ring pliers, install the plate washer and a new snap ring.
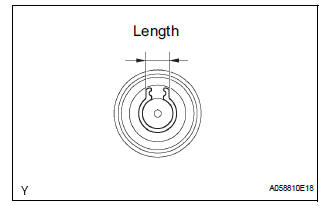
(d) Using a vernier caliper, measure length of the snap ring.
Maximum length: 5.0 mm (0.197 in.) If the length is greater than the maximum, replace it with a new snap ring
3. INSTALL DRIVE HOUSING STARTER BEARING COVER
(a) Install the drive housing starter bearing cover to the starter commutator end frame.
4. INSTALL STARTER ARMATURE PLATE
(a) Insert the starter armature plate to the starter yoke.
(b) Align the keyway of the starter plate with the key inside the starter yoke, and install the starter plate.
5. INSTALL STARTER COMMUTATOR END FRAME ASSEMBLY
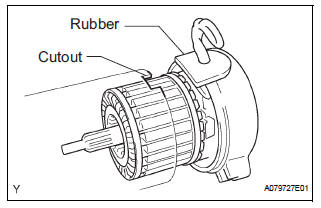
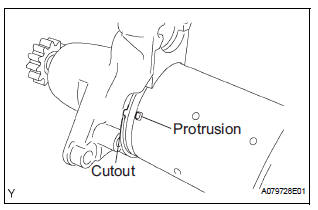
(a) Align the rubber with the convex cutout of starter yoke.
(b) Install starter commutator end frame to the starter yoke.
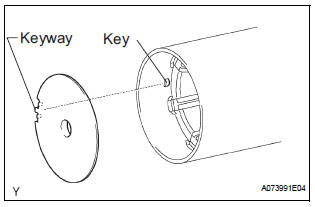
6. INSTALL STARTER YOKE ASSEMBLY
(a) Align the key of the starter yoke with the keyway of repair service starter kit.
(b) Install the starter yoke with the 2 through bolts.
Torque: 6.0 N*m (61 kgf*cm, 53 in.*lbf)
7. INSTALL REPAIR SERVICE STARTER KIT
(a) Apply grease to the plunger and the hook.
(b) Hang the plunger hook of the repair service starter kit to the drive lever.
(c) Install the plunger and return spring.
(d) Install the repair service starter kit with the 2 screws.
Torque: 7.5 N*m (76 kgf*cm, 66 in.*lbf)
(e) Connect the lead wire to the repair service starter kit with the nut.
Torque: 10 N*m (102 kgf*cm, 7 ft.*lbf)
 Inspection
1. Inspect starter assembly
NOTICE:
These tests must be performed within 3 to 5 seconds
to avoid burning out the coil.
(a) Perform the pull-in test.
(1) Disconnect the lead ...
 Installation
1. INSTALL STARTER ASSEMBLY
(a) Install the starter with the 2 bolts.
Torque: 37 N*m (380 kgf*cm, 26 ft.*lbf) for bolt
(b) Connect the starter connector.
(c) Install the terminal nut a ...
Other materials:
Control Module Performance
DTC P0607 Control Module Performance
DESCRIPTION
This DTC indicates a malfunction in the ECM.
HINT:
The ECM receives signals from each sensor to control all the functions of the
cruise control with the
microcomputer. When a malfunction is detected, fail-safe remains on until the
ignition sw ...
Disassembly
1. REMOVE RADIATOR WATER INLET
(a) Remove the 2 bolts and radiator water inlet.
2. REMOVE DRAIN PLUG
(a) Remove the drain plug and air drain plug.
(b) Remove the 2 O-rings.
3. REMOVE LOWER RADIATOR TANK
(a) Install the claw to the overhaul handle, inserting it in
the hole in Part A ...
Emergency flashers
The emergency flashers are used to warn other drivers when the
vehicle has to be stopped in the road due to a breakdown, etc.
Press the switch.
All the turn signal lights will flash.
To turn them off, press the switch
once again.
Emergency flashers
If the emergency flashers are used f ...
