Toyota Sienna Service Manual: Reassembly
1. INSTALL CENTER SUPPORT BEARING ASSEMBLY NO.1
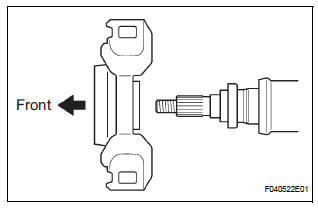
(a) Set the center support bearing assembly No. 1 (front) to the intermediate shaft, as shown in the illustration.
(b) Install a new washer to the intermediate shaft.
NOTICE: Be sure to install the bearing in the correct direction.

(c) Align the matchmarks on the front flange and shaft, and place the flange on the shaft.
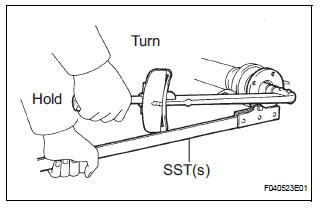
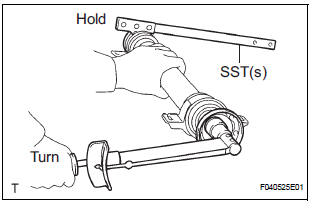
(d) Using SST(s) to hold the front flange, press the center support bearing assembly No. 1 (front) into the position by tightening down with a new nut and plate washer.
SST 09330-00021 Torque: 181 N*m (1,850 kgf*cm, 134 ft.*lbf)
(e) Loosen the nut.
(f) Torque the nut again.
Torque: 69 N*m (700 kgf*cm, 51 ft.*lbf)
(g) Using a chisel and a hammer, stake the nut.
2. INSTALL CENTER SUPPORT BEARING ASSEMBLY NO.1
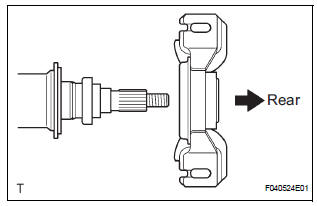
(a) Set the center support bearing assembly No. 1 (rear) on the shaft, as shown in the illustration.
(b) Install a new washer to the shaft.
NOTICE: Be sure to install the bearing in the correct direction.
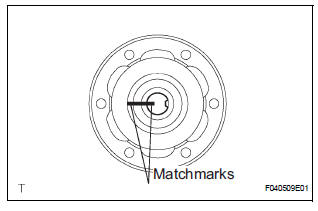
(c) Align the matchmarks on the rear flange and shaft, and place the flange on the shaft.
(d) Using SST(s) to hold the front flange, press the center support bearing assembly No. 1 (rear) into the position by tightening down with a new nut and plate washer.
SST 09330-00021 Torque: 181 N*m (1,850 kgf*cm, 134 ft.*lbf)
(e) Loosen the nut.
(f) Torque the nut again.
Torque: 69 N*m (700 kgf*cm, 51 ft.*lbf)
(g) Using a chisel and a hammer, stake the nut.
3. INSTALL INTERMEDIATE SHAFT
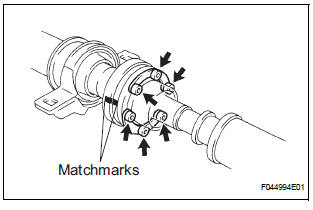
(a) Align the matchmarks on the intermediate shaft and rear propeller shaft assembly rear, then install the 2 washers and 6 bolts.
(b) Using a hexagon wrench (6 mm), loosely tighten the 6 bolts.
4. INSTALL PROPELLER SHAFT ASSEMBLY
(a) Align the matchmarks on the propeller shaft assembly flange and front flange, and connect the shaft with the 4 bolts, washers and nuts.
Torque: 74 N*m (750 kgf*cm, 54 ft.*lbf)

(b) Check that each joint of the propeller shaft is facing in the correct direction, as shown in the illustration below.
 Inspection
1. INSPECT SPIDER BEARING
(a) Check that the spider bearing moves smoothly by
turning the flange.
(b) Check for the looseness around the joint by strongly
moving the flange in the axial and ...
 Installation
1. INSTALL PROPELLER W/CENTER BEARING SHAFT ASSEMBLY
(a) Align the matchmarks on the propeller shaft
assembly rear flange and differential companion
flange, and connect the shaft with the 4 bol ...
Other materials:
Reassembly
1. INSTALL FRONT OIL PUMP OIL SEAL
(a) Using SST and a hammer, install a new oil seal to
the oil pump body.
SST 09350-32014 (09351-32140)
HINT:
The seal end should be flat with the outer edge of
the oil pump.
(b) Coat the lip of the oil seal with MP grease.
2. INSTALL FRONT OIL PUMP BODY ...
ON / OFF Indication Parameter Error
DTC 01-E2 ON / OFF Indication Parameter Error
DESCRIPTION
DTC No.
DTC Detection Condition
Trouble Area
01-E2
The command for ON/OFF control from the master
device has a problem.
Radio receiver
INSPECTION PROCEDURE
HINT:
After the inspection is ...
Engine Coolant Temperature Circuit
DESCRIPTION
A thermistor is built into the Engine Coolant Temperature (ECT) sensor, of
which the resistance value
varies according to the ECT.
The structure of the sensor and its connection to the ECM are the same as those
of the Intake Air
Temperature (IAT) sensor.
HINT:
When any ...
