Toyota Sienna Service Manual: Reclining Motor Circuit
DESCRIPTION
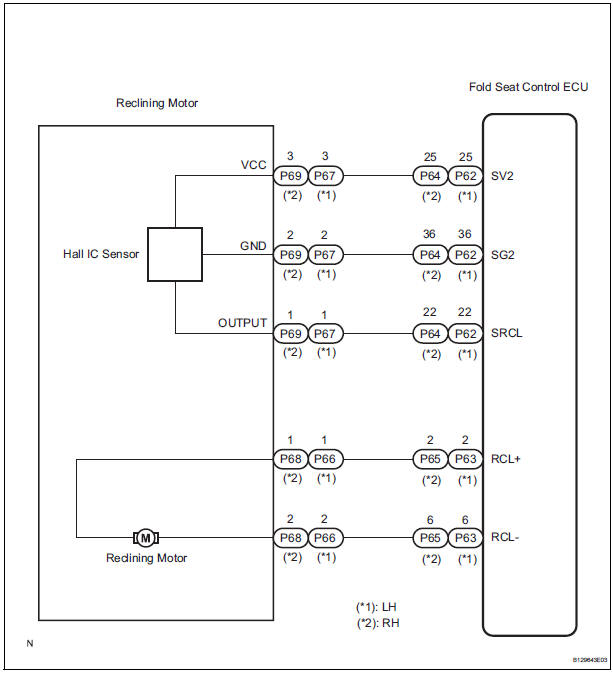
The fold seat control ECU receives a switch operation signal from the power rear no. 2 seat switch and the fold seat switch, and activates the reclining motor. At this time, the Hall IC (seatback position sensor) detects the actuation of the seatback and sends a seatback actuation signal to the fold seat control ECU.
The fold seat control ECU uses signals from the Hall IC (seatback position sensor) to detect if an object is caught or if any other abnormal condition has occurred.
WIRING DIAGRAM
INSPECTION PROCEDURE
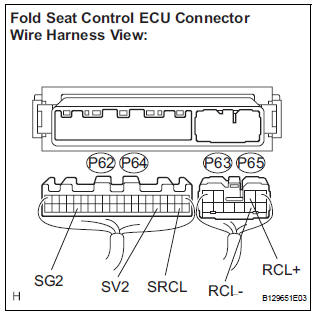
1 INSPECT FOLD SEAT CONTROL ECU
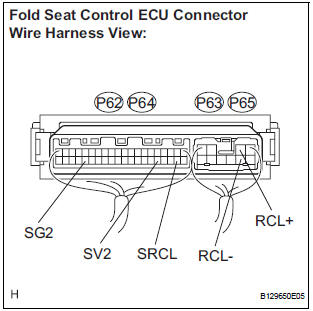
- Remove the fold seat control ECU with connectors still connected.
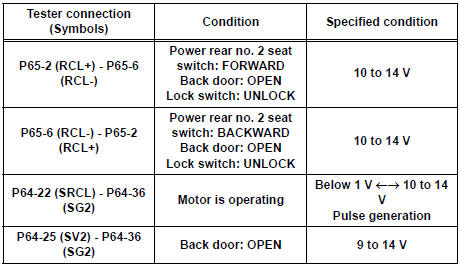
- Measure the voltage according to the value(s) in the table below.
Standard voltage: LH side
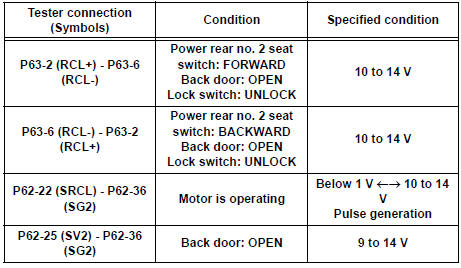
RH side
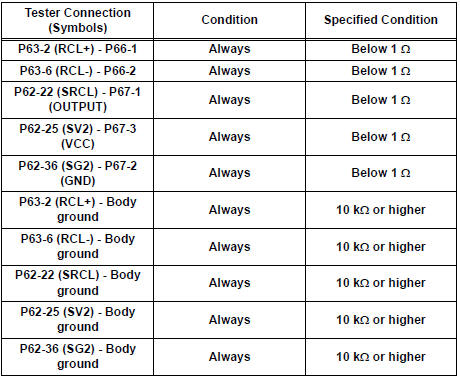
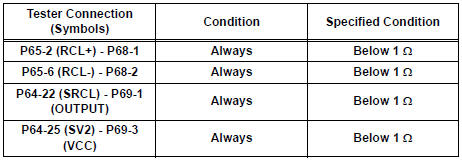
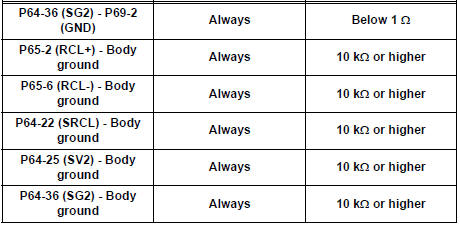
2 CHECK HARNESS AND CONNECTOR (FOLD SEAT CONTROL ECU - RECLINING MOTOR)
- Disconnect the connectors from the fold seat control ECU.
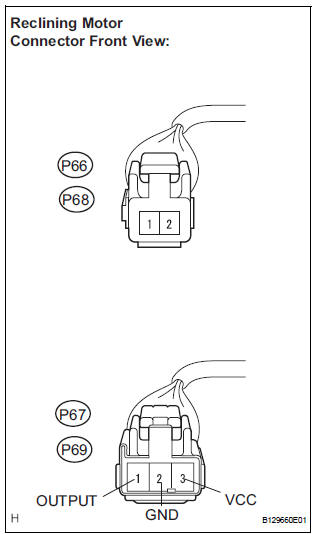
- Disconnect the connectors from the reclining motor.
- Measure the resistance according to the value(s) in the table below.
Standard resistance: LH side
RH side
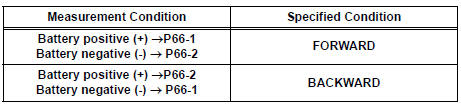
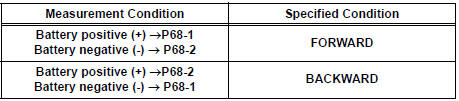
3 INSPECT RECLINING MOTOR
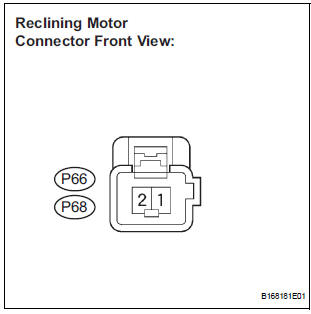
- Check reclining motor operation.
- Check if the motor rotates smoothly when the battery is connected to the reclining motor.
OK: LH side
RH side
REPLACE FOLD SEAT CONTROL ECU
 Folding Motor Circuit
DESCRIPTION
The fold seat control ECU receives a switch operation signal from the fold
seat switch and activates the
folding motor. At this time, the Hall IC (seat cushion position sensor) detects ...
 Release Actuator Circuit
DESCRIPTION
The fold seat control ECU receives a switch operation signal from the fold
seat switch and activates the
release actuator. The release actuator releases the lock of the stowed seat
b ...
Other materials:
Removal
1. PRECAUTION
HINT:
See page RS-1
2. DISCONNECT BATTERY NEGATIVE TERMINAL
Wait for 90 seconds after disconnecting the battery
terminal to prevent the airbag working.
3. PLACE FRONT WHEELS FACING STRAIGHT AHEAD
4. REMOVE STEERING WHEEL COVER LOWER NO.2
(See page RS-424)
5. REMOVE STEERING WH ...
Problem symptoms table
Before inspecting the suspected areas listed in the table
below, check the fuse and relay.
Before inspecting the suspected areas listed in the table
below, check the DTCs.
Methods used to verify the cause of the problem are listed
in order of probability in the suspected are ...
Disassembly
1. REMOVE RETURN TUBE NO.2
(a) Using SST, remove the return tube No. 2.
SST 09023-12701
2. REMOVE STEERING LEFT TURN PRESSURE TUBE
(a) Using SST, remove the left turn pressure tube.
SST 09023-38201
(b) Remove the 2 O-rings from the left turn pressure
tube.
3. REMOVE STEERING RIGH ...
