Toyota Sienna Service Manual: Removal
1. Remove front wheel
2. Remove front wiper arm head cap
Hint: (see page ww-3)
3. Remove fr wiper arm rh
HINT: (See page WW-3)
4. Remove fr wiper arm lh
HINT: (See page WW-3)
5. Remove cowl top ventilator louver subassembly
Hint: (see page ww-3)
6. Remove windshield wiper motor & link assembly
Hint: (see page ww-3)
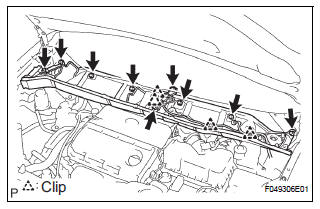
7. Remove cowl top panel sub-assembly outer front
HINT: When removing or installing the front shock absorber with coil spring RH, it is necessary to remove the cowl top panel sub-assembly outer front
(a) Disconnect the wire harness from the cowl top panel sub-assembly outer front.
(b) Remove the 9 bolts, cowl top brace and cowl top panel sub-assembly outer front.
8. REMOVE FRONT STABILIZER LINK ASSEMBLY LH
(a) Remove the nut and disconnect the front stabilizer link assembly LH from the shock absorber assembly front LH.
HINT: If the ball joint turns together with the nut, use a hexagon (6 mm) wrench to hold the stud.
9. REMOVE FRONT SHOCK ABSORBER WITH COIL SPRING
(a) Loosen the lock nut.
NOTICE:
- Do not loosen the nut except for the purpose of disassembling the shock absorber assembly front LH with coil spring.
- Do not remove the lock nut.
(b) Remove the bolt, and disconnect the front flexible hose No.1 and speed sensor front LH.
(c) Remove the 2 nuts and 2 bolts on the lower side of the front shock absorber with coil spring
NOTICE: When removing the bolt, hold the nut not to rotate.
(d) Remove the 3 nuts on the upper side of the front shock absorber with coil spring.
(e) Remove the front shock absorber with the coil spring.
 Front shock absorber with coil spring
COMPONENTS
...
 Disassembly
1. FIX FRONT SHOCK ABSORBER WITH COIL SPRING
(a) Install 2 nuts and a bolt to the bracket at the lower
side of the front shock absorber with coil spring and
secure it in a vise.
2. REMOVE FRONT SU ...
Other materials:
Data list / active test
HINT:
By accessing the DATA LIST displayed on the intelligent
tester, you can perform such functions as reading the values
of switches and sensors without removing any parts. Reading
the DATA LIST as the first step in troubleshooting is one
method to shorten labor time.
1. DATA LIST FOR CENTER ...
Installation
1. INSTALL REAR DIFFERENTIAL SIDE GEAR SHAFT BOLT
(a) Install the bolt tightening the nut through the plate
washer.
2. INSTALL REAR DRIVE SHAFT ASSEMBLY LH
HINT:
(See page DS-26)
3. INSTALL REAR AXLE SHAFT NUT LH
HINT:
(See page DS-26)
4. INSTALL REAR SPEED SENSOR LH
HINT:
(See page D ...
Phone screen
To display the screen shown below, press the
switch on the steering
wheel or the button.
Several functions are available to operate on each screen that is displayed
by selecting the 4 tabs.
Device name
Bluetooth® connection status
Telephone switch
Microphone
The vehicleâ ...
