Toyota Sienna Service Manual: Removal
1. DRAIN BRAKE FLUID
NOTICE: Wash brake fluid off immediately if it adheres to any painted surface.
2. DISCONNECT BATTERY NEGATIVE TERMINAL
3. REMOVE AIR CLEANER ASSEMBLY WITH HOSE
4. REMOVE BRAKE ACTUATOR WITH BRACKET
(a) Release the latch of the brake actuator connector to disconnect the connector.
(b) Using SST, disconnect the 6 brake tubes from the actuator with bracket.
SST 09023-00101
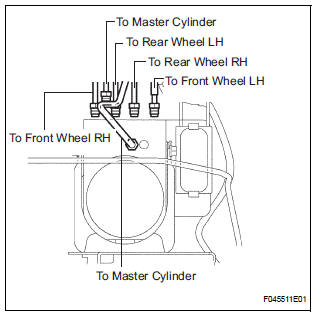
(c) Use tags or make a memo to identify the places to reconnect.
(d) Remove the 3 bolts and the actuator with bracket.
NOTICE: Be careful not to damage the brake tubes and wire harness.
5. REMOVE BRAKE ACTUATOR
(a) Remove the 2 nuts and the brake actuator assembly from the brake actuator bracket.
 On-vehicle inspection
1. CONNECT INTELLIGENT TESTER
(a) Connect the intelligent tester to the DLC3.
(b) Start the engine and run at idle.
(c) Select the ACTIVE TEST mode on the intelligent
tester.
HINT:
Pleas ...
 Installation
1. INSTALL BRAKE ACTUATOR
NOTICE:
Do not remove the hole plugs before connecting the
brake tubes. New actuators are filled with brake
fluid.
(a) Install the brake actuator assembly with the 2 nut ...
Other materials:
Evaporative Emission Control System Leak Detected
DTC SUMMARY
DESCRIPTION
The circuit description can be found in the EVAP (Evaporative Emission)
System (See page ES-409).
INSPECTION PROCEDURE
Refer to the EVAP System (See page ES-412).
MONITOR DESCRIPTION
5 hours*1 after the ignition switch is turned off, the electric vacuum pump
c ...
Active head restraints
When the occupant’s lower back
presses against the seatback during
a rear-end collision, the head
restraint moves slightly forward
and upward to help reduce the
risk of whiplash on the seat occupant
Active head restraints
Even small forces applied to the seatback may cause the head rest ...
Installation
1. INSTALL BACK DOOR OUTSIDE GARNISH
Install the back door outside opener switch with the
2 screws.
Install the back door outside garnish with the 5 nuts
and a clip.
Connect the licence light connector.
2. INSTALL LH BACK-UP LIGHT ASSEMBLY (See page
LI-90)
3. INSTALL RH ...
