Toyota Sienna Service Manual: Removal
HINT: Remove the RH by the same procedure as the LH side.
1. REMOVE REAR WHEEL
2. SEPARATE SKID CONTROL SENSOR WIRE
(a) Disconnect the connector from the skid control sensor.
3. REMOVE REAR BRAKE DRUM SUB-ASSEMBLY (for Drum Type)
(a) Place matchmarks on the rear brake drum subassembly and the axle hub.
(b) Remove the rear brake drum sub-assembly.
4. REMOVE REAR DISC BRAKE CALIPER ASSEMBLY LH (for Disc Type)
(a) Remove the 2 bolts and rear brake caliper assembly LH.
5. REMOVE REAR DISC (for Disc Type)
(a) Place matchmarks on the rear disc and the axle hub.
(b) Remove the rear disc.
6. REMOVE REAR AXLE HUB & BEARING ASSEMBLY LH (See page AH-16)
7. REMOVE REAR SPEED SENSOR
(a) Mount the rear axle hub in a soft jaw vise.
NOTICE: Replace the axle hub assembly if it is dropped or a strong shock is given to it.
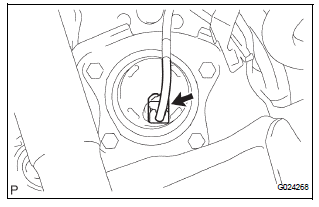
(b) Using a pin punch and hammer, drive out the 2 pins and remove the 2 attachments from SST.
(c) Using SST and 2 bolts (Diameter: 12 mm, pitch: 1.5 mm), remove the skid control sensor from the rear axle hub.
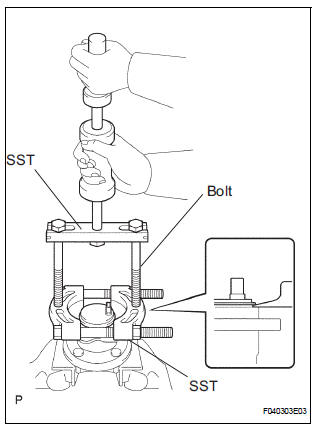
SST 09520-00031 (09520-00040), 09521-00020, 09950-00020
NOTICE:
- If a damage is inflicted to the sensor rotor is damaged, replace the axle hub assembly.
- Do not scratch the contacting surface of the axle hub and speed sensor.
 Rear speed sensor (for 2wd)
Components
...
 Inspection
1. INSPECT REAR SPEED SENSOR
(a) Disconnect the skid control sensor connector.
(b) Measure the resistance between terminals 1 and 2
of the skid control sensor connector.
OK:
Resistance:
le ...
Other materials:
Installation
1. INSTALL TRANSMISSION WIRE
(a) Coat the O-ring of the transmission wire connector
with ATF and install it.
(b) Install the transmission wire with the bolt.
Torque: 5.4 N*m (55 kgf*cm, 48 ft.*lbf)
2. CONNECT TRANSMISSION WIRE
(a) Coat the O-ring of the ATF temperature sensor with
...
Child restraint systems with a top tether strap (second seat)
Secure the child restraint system
using the seat belt or
LATCH anchors, and adjust the
head restraint to the uppermost
position.
*: Ottoman seat only
Latch the hook onto the anchor
bracket and tighten the top
tether strap.
Make sure the top tether strap is
secure ...
Window defogger switch
INSPECTION
1. INSPECT WINDOW DEFOGGER SWITCH
Check the defogger switch illuminates.
Standard
If the result is not as specified, replace the switch
assembly or bulb.
Check the defogger timer.
Connect the positive (+) lead from the battery
to terminal 2 and ...
