Toyota Sienna Service Manual: Removal
HINT:
- Use the same procedures for the RH side and LH side.
- The procedures listed below are for the LH side.
1. PRECAUTION
CAUTION: Be sure to read "PRECAUTION" thoroughly before servicing.
2. DISCONNECT CABLE FROM NEGATIVE BATTERY TERMINAL
CAUTION: Wait for 90 seconds after disconnecting the cable to prevent the airbag working.
3. REMOVE FRONT DOOR SCUFF PLATE LH
4. REMOVE REAR DOOR SCUFF PLATE LH
5. REMOVE FRONT DOOR OPENING TRIM WEATHERSTRIP LH
6. REMOVE REAR DOOR WEATHERSTRIP LH
7. REMOVE LAP BELT OUTER ANCHOR COVER LH
8. REMOVE CENTER PILLAR GARNISH LOWER LH
9. REMOVE FRONT SEAT OUTER BELT ASSEMBLY
10. REMOVE SIDE AIRBAG SENSOR LH
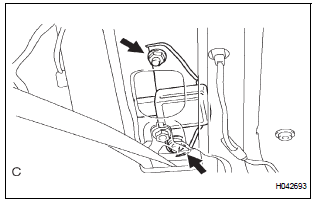
- Disconnect the connector from the side airbag sensor LH.
- Remove the 2 nuts and the side airbag sensor LH.
 On-vehicle inspection
1. INSPECT SIDE AIRBAG SENSOR (VEHICLE NOT
INVOLVED IN COLLISION)
Perform a diagnostic system check.
2. INSPECT SIDE AIRBAG SENSOR (VEHICLE
INVOLVED IN COLLISION AND AIRBAG HAS NOT
DEP ...
 Installation
HINT:
Use the same procedures for the RH side and LH side.
The procedures listed below are for the LH side.
1. INSTALL SIDE AIRBAG SENSOR LH
Check that the ignition ...
Other materials:
ECM Power Source Circuit
DESCRIPTION
When the ignition switch is turned to the ON position, the battery voltage is
applied to terminal IGSW of
the ECM. The ECM MREL output signal causes a current to flow to the coil,
closing the contacts of the EFI
relay and supplying power to terminal +B of the ECM.
If the igniti ...
Reassembly
1. INSTALL LIGHT CONTROL ECU (DISCHARGE HEADLIGHT)
Install a new headlight leveling motor base packing.
Install the headlight leveling motor assembly as
shown in the illustration.
Connect the connector with the claw
Install the light control ECU with the 2 ...
On-vehicle inspection
1. INSPECT FUEL CUT RPM
(a) Increase the engine speed to at least 3500 rpm.
(b) Use a sound scope to check for injector operating
sounds.
(c) Check that when the throttle lever is released,
injector operating sounds stop momentarily (at 2500
rpm) and then resume (at 1400 rpm).
Standard
...
