Toyota Sienna Service Manual: Removal
1. DISCONNECT CABLE FROM NEGATIVE BATTERY TERMINAL
CAUTION: Wait for 90 seconds after disconnecting the cable to prevent the airbag working
2. REMOVE FRONT SEAT ASSEMBLY
HINT:
- Refer to the instructions for removal of the front seat assembly (for flat type).
- Refer to the instructions for removal of the front seat assembly (for manual seat).
- Refer to the instructions for removal of the front seat assembly (for power seat).
3. REMOVE FRONT DOOR SCUFF PLATE
4. REMOVE REAR DOOR SCUFF PLATE
5. REMOVE FRONT DOOR WEATHERSTRIP
6. REMOVE REAR DOOR WEATHERSTRIP
7. REMOVE CENTER PILLAR LOWER GARNISH
8. REMOVE FRONT SEAT OUTER BELT ASSEMBLY
NOTICE:
- Removal operation concerning the seat belt with the pretensioner must be started in 90 seconds or more after the ignition switch is turned OFF and the battery negative terminal is disconnected.
- Carefully read the notices for the "pretensioner" in the SRS airbag system and the outer belt assembly.
- Remove the floor anchor cover.
- Remove the bolt and the front seat outer belt assembly on the floor anchor side.
- Remove the nut and the front seat outer belt assembly on the shoulder anchor side.
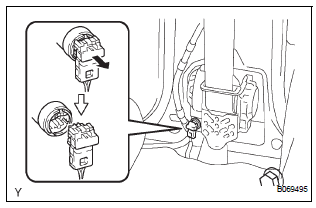
- Disconnect the pretensioner connector, as shown in the illustration.
- Remove the 2 bolts and front seat outer belt assembly.
9. REMOVE CENTER PILLAR UPPER GARNISH
10. REMOVE FRONT SHOULDER BELT ANCHOR ADJUSTER ASSEMBLY
- Remove the bolt and front shoulder belt anchor adjuster assembly.
 Front seat outer belt assembly
COMPONENTS
...
 Installation
1. INSTALL FRONT SHOULDER BELT ANCHOR
ADJUSTER ASSEMBLY
Install the front shoulder belt anchor adjuster
assembly with the bolt.
Torque: 42 N*m (430 kgf*cm, 31 ft.*lbf)
2. INSTALL CEN ...
Other materials:
Battery
Check the battery as follows:
Battery exterior
Make sure that the battery terminals are not corroded and that
there are no loose connections, cracks, or loose clamps.
Terminals
Hold-down clamp
Before recharging
When recharging, the battery produces hydrogen gas which is flammable an ...
Data list / active test
1. DATA LIST
HINT:
Using the DATA LIST displayed on the intelligent tester,
you can read the value of the switch, sensor, actuator,
etc. without parts removal. Reading the DATA LIST as
the first step of troubleshooting is one way to shorten the
labor time.
Connect the intelligent tester to ...
On-vehicle inspection
1. Inspect intake air surge tank assembly
(A) inspection procedure when applying voltage
between the terminals:
(1) Disconnect the connector from the intake air
control valve.
(2) Apply battery voltage between terminals 1 (-)
and 2 (+) of the intake air control valve. Check
that a click ...
