
Toyota Sienna Service Manual: Removal
1. REMOVE GLOVE COMPARTMENT DOOR STOPPER SUB-ASSEMBLY
2. REMOVE GLOVE COMPARTMENT DOOR ASSEMBLY
3. REMOVE STEREO COMPONENT AMPLIFIER ASSEMBLY (W/ STEREO COMPONENT AMPLIFIER)
4. REMOVE DISTANCE CONTROL ECU ASSEMBLY
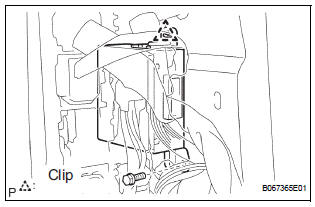
- Remove the bolt.
- Disengage the clip and remove the distance control ECU assembly.
 Components
...
 Installation
1. INSTALL DISTANCE CONTROL ECU ASSEMBLY
Using a torque wrench, install the bolt.
Torque: 5 N*m (51 kgf*cm, 44 in.*lbf)
NOTICE:
Do not install the dropped or shocked distance
control ...
Other materials:
Reassembly
1. INSTALL OVERDRIVE DIRECT CLUTCH O-RING
(a) Coat an O-ring with ATF, and install it to the direct
clutch drum.
NOTICE:
Make sure that the O-ring is not twisted or
pinched when it is installed.
2. INSTALL OVERDRIVE DIRECT CLUTCH DRUM SUBASSEMBLY
(a) Coat the direct clutch drum with A ...
Selecting the audio
source
Switching between audio sources such as radio and CD are
explained in this section.
Changing audio source
Press the “AUDIO� button to display the audio source selection
screen.
If the audio source selection screen is not displayed, press the “AUDIO�
button again.
Select the des ...
Disassembly
1. INSPECT UNDERDRIVE PLANETARY GEAR
PRELOAD
HINT:
(See page AX-260)
2. REMOVE FRONT PLANETARY GEAR NUT
(a) Using SST, loosen the staked part of the lock nut.
SST 09930-00010 (09931-00010, 09931-00020),
09387-00050
(b) Place the underdrive planetary gear in a soft jaw
vise.
NOTIC ...
