Toyota Sienna Service Manual: Removal
1. REMOVE REAR DOOR SCUFF PLATE LH
2. REMOVE REAR DOOR WEATHERSTRIP LH
3. REMOVE BACK DOOR WEATHERSTRIP
4. REMOVE BACK DOOR SCUFF PLATE
5. REMOVE QUARTER TRIM FRONT PANEL ASSEMBLY LH
6. REMOVE VOLTAGE INVERTER ASSEMBLY
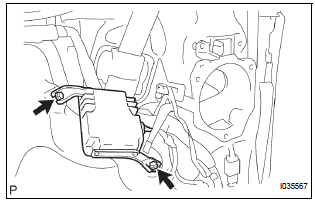
- Disconnect the connector.
- Remove the 2 bolts and the voltage inverter assembly.
 On-vehicle inspection
1. INSPECT VOLTAGE INVERTER ASSEMBLY
Inspect the voltage inverter assembly.
...
 Inspection
1. INSPECT INVERTER MAIN SWITCH
Inspect the continuity between terminal at the each
switch position shown in the chart.
If continuity is not as specified, replace the main
swit ...
Other materials:
Reassembly
1. INSTALL MAGNETIC CLUTCH ASSEMBLY
(a) Install the magnetic clutch stator while aligning the
protrusion on the stator with the notch on the air
compressor assembly as shown in the illustration.
(b) Using a snap ring expander, install a new snap ring
with the chamfered side facing up.
...
Open in Rear Curtain Shield Squib RH Circuit
DTC B1631/84 Open in Rear Curtain Shield Squib RH Circuit
DESCRIPTION
The rear curtain shield squib RH circuit consists of the center airbag sensor
assembly and the curtain
shield airbag assembly RH.
The circuit instructs the SRS to deploy when deployment conditions are met.
DTC B1631/84 ...
Distance Control ECU Malfunction
DTC P1617 Distance Control ECU Malfunction
DESCRIPTION
In the dynamic laser cruise control system, the ECM and the distance control
ECU communicate with one
another to control the system based on some designation information. If the
designation information of the
ECM and distance control ECU ...
