Toyota Sienna Service Manual: Removal
HINT: On the RH side, use the same procedures as on the LH side.
1. REMOVE REAR NO. 1 SEAT ASSEMBLY LH
HINT:
- Captain seat type:
- Center seat type:
2. REMOVE REAR DOOR WEATHERSTRIP LH
3. REMOVE ROPE HOOK ASSEMBLY
4. REMOVE BACK DOOR SCUFF PLATE
5. REMOVE ROOF HEADLINING GARNISH REAR
6. REMOVE REAR DOOR SCUFF PLATE LH
7. REMOVE QUARTER TRIM PANEL ASSEMBLY LH
8. REMOVE RR WINDOW SIDE GARNISH ASSEMBLY NO.2 LH
9. REMOVE RR WINDOW SIDE GARNISH ASSEMBLY LH
10. REMOVE SIDE WINDOW ASSEMBLY REAR LH
- Disconnect the connectors.
- Remove the 2 nuts and 2 bolts.
Torque: Bolt 5.5 N*m (56 kgf*cm, 49 in.*lbf)
- Remove the window.
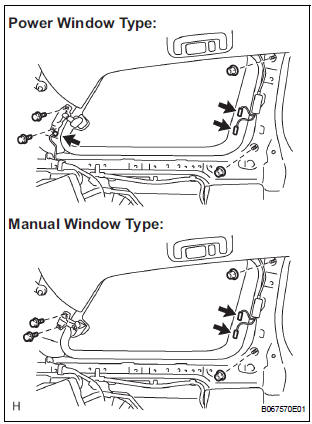
11. REMOVE POWER VENT WINDOW MOTOR ASSEMBLY LH (POWER WINDOW TYPE)
- Using a screwdriver, remove the window motor.
12. REMOVE QUARTER WINDOW LOCK ASSEMBLY LH (MANUAL WINDOW TYPE)
- Remove the screw and window lock.
13. REMOVE SIDE REAR WINDOW WEATHERSTRIP LH
 Rear side window glass
COMPONENTS
...
 Installation
1. INSTALL SIDE REAR WINDOW WEATHERSTRIP LH
2. INSTALL QUARTER WINDOW LOCK ASSEMBLY LH
3. INSTALL POWER VENT WINDOW MOTOR
ASSEMBLY LH
4. INSTALL SIDE WINDOW ASSEMBLY REAR LH
5. INSTALL RR WINDOW ...
Other materials:
Short in Curtain Shield Squib LH Circuit
DTC B1165/87 Short in Curtain Shield Squib LH Circuit
DESCRIPTION
The curtain shield squib LH circuit consists of the center airbag sensor
assembly and the curtain shield
airbag assembly LH.
The circuit instructs the SRS to deploy when deployment conditions are met.
DTC B1165/87 is record ...
Installation
1. INSTALL FRONT SHOULDER BELT ANCHOR
ADJUSTER ASSEMBLY
Install the front shoulder belt anchor adjuster
assembly with the bolt.
Torque: 42 N*m (430 kgf*cm, 31 ft.*lbf)
2. INSTALL CENTER PILLAR UPPER GARNISH
3. INSTALL FRONT SEAT OUTER BELT ASSEMBLY
NOTICE:
Do not disassemble ...
Installation
1. INSTALL ACCELERATOR PEDAL ROD
NOTICE:
Avoid physical shock to the accelerator pedal
assembly.
Do not disassemble the accelerator pedal
assembly.
Install the accelerator pedal rod with the 2 nuts.
Torque: 4.9 N*m (50 kgf*cm, 43 in.*lbf)
Connect the ...
