Toyota Sienna Service Manual: Removal
1. REMOVE NO. 1 ENGINE UNDER COVER (See page EM-26) 2. REMOVE EXHAUST PIPE ASSEMBLY for 2WD:(See page EX-2) for 4WD:(See page EX-8) 3. DRAIN ENGINE COOLANT (See page CO-6) 4. DRAIN ENGINE OIL (See page LU-4) 5. REMOVE NO. 2 MANIFOLD STAY (See page EM-39) 6. REMOVE NO. 2 EXHAUST MANIFOLD HEAT INSULATOR (See page EM-40) 7. REMOVE EXHAUST MANIFOLD SUB-ASSEMBLY LH (See page EM-40) 8. REMOVE ENGINE OIL COOLER
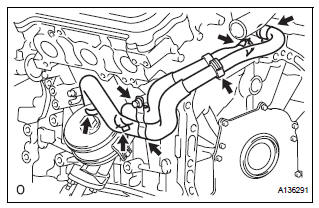
(a) Remove the bolt, 2 clamps, and 4 clips and disconnect the 2 water by-pass hoses.
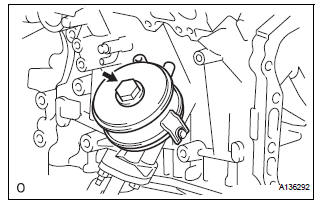
(b) Remove the oil cooler union bolt, oil cooler assembly, and O-ring.
INSPECTION
1. INSPECT ENGINE OIL COOLER
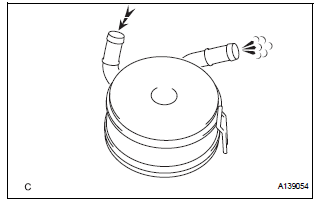
(a) Check the engine oil cooler for damage or clogging.
If necessary, replace the oil cooler.
 Engine oil cooler
Components
...
 Installation
1. INSTALL ENGINE OIL COOLER
(a) Clean the oil cooler contact surface on the cooler
mounting.
(b) Install a new O-ring to the oil cooler.
(c) Install the oil cooler assembly with the uni ...
Other materials:
Opening/closing the sliding door
Sliding door handle
Open/close
Vehicles with power sliding
doors: The sliding door will be
automatically and completely
opened and closed by the following.
Pulling the outside handle.
Sliding the inside handle forward
to close or backward to
open.
Power sliding door switches (v ...
Diagnosis display detailed
description
HINT:
This section contains a detailed description of displays
within diagnostic mode.
Illustrations may differ from the actual vehicle depending
on the device settings and options. Therefore, some
detailed areas may not be shown exactly the same as on
the actual vehicle.
...
Customize parameters
HINT:
The following items can be customized.
NOTICE:
When the customer requests a change in a function,
first make sure that customization of the function(s) is
possible.
Be sure to record the current settings before
customizing.
When troubleshooting a function, fir ...
