Toyota Sienna Service Manual: Removal
1. REMOVE BATTERY (See page EM-26) 2. REMOVE NO. 2 AIR CLEANER INLET (See page EM- 28) 3. REMOVE AIR CLEANER CAP SUB-ASSEMBLY (See page FU-13) 4. REMOVE AIR CLEANER FILTER ELEMENT (See page EM-28) 5. REMOVE AIR CLEANER CASE SUB-ASSEMBLY (See page EM-28) 6. REMOVE AIR CLEANER BRACKET
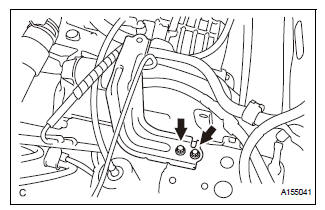
(a) Remove the 2 bolts and the air cleaner bracket.
7. REMOVE NO. 1 AIR CLEANER INLET
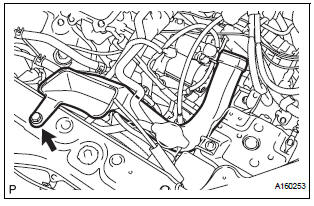
(a) Remove the bolt and the No. 1 air cleaner inlet.
8. REMOVE STARTER ASSEMBLY
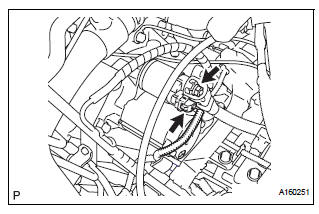
(a) Disconnect the starter connector.
(b) Open the terminal cap and remove the nut and the starter wire.
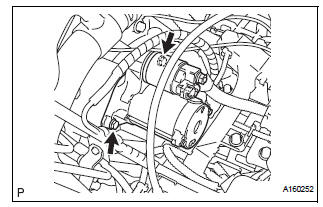
(c) Remove the 2 bolts and the starter.
 Starter
Components
...
 Disassembly
1. Remove repair service starter kit
(a) Remove the nut and disconnect the lead wire from
the repair service starter kit.
(b) Remove the 2 screws which are used to secure the
repair servic ...
Other materials:
Initialization
NOTICE:
Resetting the power window motor (initializing the
pulse sensor) is necessary when the battery terminal
is disconnected; when the master switch, wire
harness, power window regulator and power window
motor are replaced or removed/installed; or when the
fuses are replaced. ...
Door pockets
Front
Rear
NOTICE
Rear: Make sure magazines are not bent
or protruding from the sliding door pockets.
Do not insert anything too big so that
the shape of the sliding door pockets is
distorted. Such objects may obstruct the
opening/closing of the sliding ...
How to proceed with
troubleshooting
1 VEHICLE BROUGHT TO WORKSHOP
2 INSPECT BATTERY VOLTAGE
Standard voltage:
11 to 14 V
If the voltage is below 11 V, recharge or replace the battery
before proceeding.
3 BASIC INSPECTION
Turn the ignition switch ON.
Check whether or not the radio receiver turns on.
Result
4 CHE ...
