Toyota Sienna Service Manual: Removal
1. REMOVE TRANSFER CASE NO.1 PLUG (See page TF-8)
2. REMOVE TRANSFER DRAIN PLUG
(a) Remove the transfer drain plug, drain gasket and bleed transfer oil.
3. REMOVE EXHAUST PIPE ASSEMBLY
HINT: (See page EX-8)
4. REMOVE PROPELLER WITH CENTER BEARING SHAFT ASSEMBLY
HINT: (See page PR-3)
5. REMOVE TRANSFER EXTENSION HOUSING TYPE T OIL SEAL
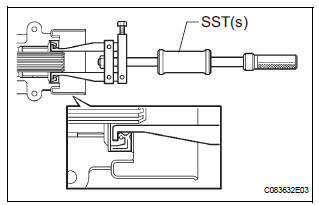
(a) Using SST(s), remove the transfer extension housing type T oil seal from the transfer extension housing sub- assembly.
SST 09308-00010
NOTICE: Be careful not to damage the oil-seal-fitted surface and the inside surface of the bush.
 Extension housing oil seal
COMPONENTS
...
 Installation
1. INSTALL TRANSFER EXTENSION HOUSING TYPE T OIL SEAL
(a) Using SST(s), install anew transfer extension
housing type T oil seal to he transfer extension
housing sub-assembly at the position sho ...
Other materials:
Fastening the seat belt (for the third center seat)
Take the plate out of the holder,
and then pull down the seat
belt.
Push plate “A” into buckle “A”
until a click sound is heard.
Push plate “B” into buckle “B”
until a click sound is heard.
...
Installation
1. INSTALL HEADLIGHT ASSEMBLY
Connect the connectors.
Install the headlight assembly with the bolt and 3
screws.
2. INSTALL FRONT BUMPER ASSEMBLY
3. CONNECT CABLE TO NEGATIVE BATTERY
TERMINAL
4. VEHICLE PREPARATION FOR HEADLIGHT AIMING
5. PREPARATION FOR HEADLIGHT AIMI ...
Display Signal Circuit between Video Terminal and Television Display
DESCRIPTION
This is the display signal circuit from the video terminal to the television
display assembly.
WIRING DIAGRAM
INSPECTION PROCEDURE
1 CHECK HARNESS AND CONNECTOR (TELEVISION DISPLAY ASSEMBLY - VIDEO
TERMINAL)
Disconnect the connectors from the video terminal and
tele ...
