Toyota Sienna Service Manual: Repair
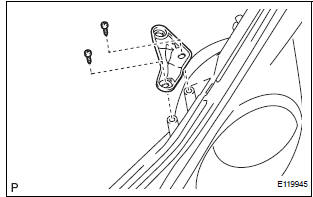
1. INSTALL HEADLIGHT PROTECTOR RETAINER UPPER
HINT:
- If the installation area of the headlight assembly is damaged, use the supply bracket for low-cost repair.
- Ensure that the headlight assembly is not damaged.
- Cut off the part shaded in the illustration and sand smooth with sandpaper.
NOTICE: After cutting off the part, place the headlight protector retainer upper against the bosses and gradually file away until installation is possible.
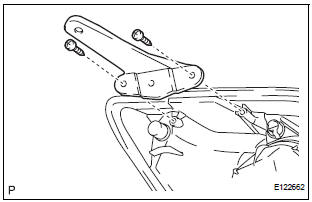
- Install the headlight protector retainer upper with the 2 screws.
2. INSTALL LOWER HEADLIGHT BRACKET
HINT:
- If the installation area of the headlight assembly is damaged, use the supply bracket for low-cost repair.
- Ensure that the headlight assembly is not damaged.
- Cut off the part shaded in the illustration and sand smooth with sandpaper.
NOTICE: After cutting off the part, place the lower headlight bracket against the bosses and gradually file away until installation is possible.
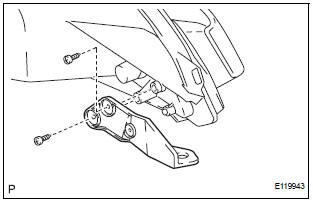
- Install the lower headlight bracket with the 2 screws.
3. INSTALL INNER HEADLIGHT MOUNTING BRACKET
HINT:
- If the installation area of the headlight assembly is damaged, use the supply bracket for low-cost repair.
- Ensure that the headlight assembly is not damaged.
- Cut off the part shaded in the illustration and sand smooth with sandpaper.
NOTICE: After cutting off the part, place the inner headlight mounting bracket against the bosses and gradually file away until installation is possible.
- Install the inner headlight mounting bracket with the 2 screws.
 Installation
1. INSTALL HEADLIGHT ASSEMBLY
Connect the connectors.
Install the headlight assembly with the bolt and 3
screws.
2. INSTALL FRONT BUMPER ASSEMBLY
3. CONNECT CABLE TO NEGATI ...
 Daytime running light resister
On-vehicle inspection
1. DRL RESISTOR
Check that there is resistance between the
terminals as shown in the chart.
Resistance
...
Other materials:
Clock
PARTS LOCATION
On-vehicle inspection
1. INSPECT INTEGRATION CONTROL & PANEL ASSEMBLY
Disconnect the A9 connector.
Measure the voltage according to the value(s) in the
table below.
Standard voltage
Measure the resistance according to the value(s) in
the ...
CAN Bus Line
DESCRIPTION
When any DTC for the CAN communication system is output, first measure the
resistance between the
terminals of the DLC3 to specify the trouble area, and check that there is no
short in the CAN main wire,
between the main wire, and +B or GND.
WIRING DIAGRAM
INSPECTION PRO ...
Cellular Phone Registration Failure, Phone Directory Transfer Failure
INSPECTION PROCEDURE
1 CHECK CURRENT CONDITIONS
Proceed to the next step according to the table below.
RESULT
2 CHECK USING ANOTHER CELLULAR PHONE
Check if the system functions using another Bluetooth
compatible cellular phone.
HINT:
Confirm that either the same or a di ...
