Toyota Sienna Service Manual: Replacement
1. REPLACE GENERATOR DRIVE END FRAME BEARING
(a) Remove the 4 screws and retainer plate from the drive end frame.
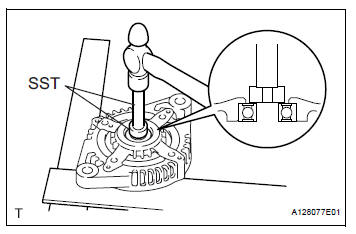
(b) Using SST and a hammer, tap out the drive end frame bearing from the drive end frame.
SST 09950-60010 (09951-00250), 09950-70010 (09951-07100)
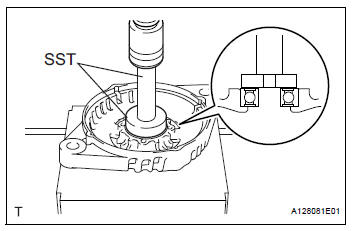
(c) Using SST and a press, press in a new generator drive end frame bearing.
SST 09950-60010 (09951-00470), 09950-70010 (09951-07100)
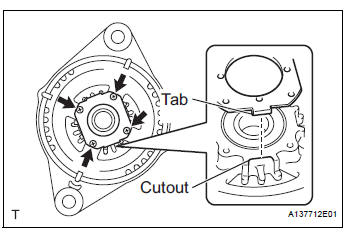
(d) Fit the tabs on the retainer plate into the cutouts on the drive end frame to install the retainer plate.
(e) Install the 4 screws.
Torque: 2.3 N*m (23 kgf*cm, 20 in.*lbf)
 Inspection
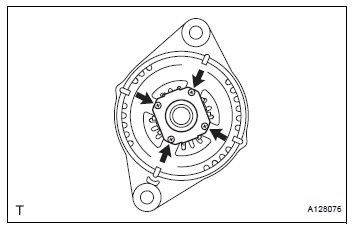
1. Inspect generator clutch pulley
(a) Hold the center of the pulley, and confirm that the
outer ring turns counterclockwise and does not turn
clockwise.
If the result is not as specified, r ...
 Reassembly
1. INSTALL GENERATOR ROTOR ASSEMBLY
(a) Place the drive end frame on the clutch pulley.
(b) Install the generator rotor assembly to the drive end
frame.
(c) Place a new generator washer ...
Other materials:
Camshaft Position "A" Actuator Circuit
DESCRIPTION
The Variable Valve Timing (VVT) system includes the ECM, Oil Control Valve
(OCV) and VVT controller.
The ECM sends a target duty-cycle control signal to the OCV. This control signal
regulates the oil
pressure supplied to the VVT controller. Camshaft timing control is perform ...
Installation
1. INSTALL BLOWER ASSEMBLY
(a) Install the blower assembly.
(b) Install the bolt, the 2 screws and the nut.
Torque: Bolt A
9.8 N*m (100 kgf*cm, 87 in.*lbf)
(c) Install the 2 clamps and 2 nuts and wire harness.
2. INSTALL INSTRUMENT PANEL SUB-ASSEMBLY WITH PASSENGER AIRBAG ASSEMBLY
H ...
Inspection
1. INSPECT BRAKE DISC INSIDE DIAMETER
(a) Using a brake drum gauge or equivalent, measure
the inside diameter of the disc.
Standard inside diameter:
190 mm (7.480 in.)
Maximum inside diameter:
191 mm (7.520 in.)
2. INSPECT PARKING BRAKE SHOE LINING THICKNESS
(a) Using a ruler, measur ...
