Toyota Sienna 2010-2024 Owners Manual: Stowing the spare tire
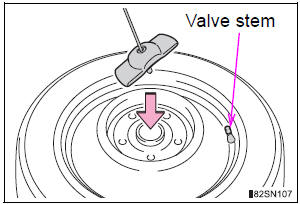
- Lay down the tire with the outer side (valve stem) facing up, and install the holding bracket.
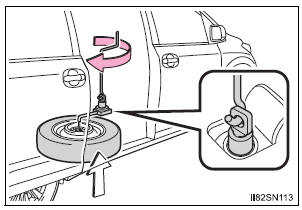
- Turn the jack handle clockwise to raise the tire until the tire is in the correct position as the jack handle skips.
- Stow the tools.
The compact spare tire
- The compact spare tire is identified by the label “TEMPORARY USE ONLY” on the tire sidewall.
- se the compact spare tire temporarily, and only in an emergency.
Make sure to check the tire inflation pressure of the compact spare tire.
After completing the tire change
The tire pressure warning system must be reset.
When using the compact spare tire
As the compact spare tire is not equipped with a tire pressure warning valve and transmitter, low inflation pressure of the spare tire will not be indicated by the tire pressure warning system. Also, if you replace the compact spare tire after the tire pressure warning light comes on, the light remains on.
When the compact spare tire is equipped
The vehicle becomes lower when driving with the compact spare tire compared to when driving with standard tires
If you have a flat front tire on a road covered with snow or ice
Install the compact spare tire on one of the rear wheels of the vehicle.
Perform the following steps and fit tire chains to the front tires:
- Replace a rear tire with the compact spare tire.
- Replace the flat front tire with the tire removed from the rear of the vehicle.
- Fit tire chains to the front tires.
| WARNING When using the compact spare tire
When the compact spare tire is attached The vehicle speed may not be correctly detected, and the following systems may not operate correctly:
Also, not only can the following system not be utilized fully, but it may even negatively affect the drive-train components:
Speed limit when using the compact spare tire Do not drive at speeds in excess of 50 mph (80 km/h) when a compact spare tire is installed on the vehicle. The compact spare tire is not designed for driving at high speeds. Failure to observe this precaution may lead to an accident causing death or serious injury. After using the tools and jack Before driving, make sure all the tools and jack are securely in place in their storage location to reduce the possibility of personal injury during a collision or sudden braking. When stowing the flat tire
|
| NOTICE When loosening or tightening the spare tire clamp bolt Do not use an impact wrench. Use the adapter socket and jack handle. Be careful when driving over bumps with the compact spare tire installed on the vehicle The vehicle becomes lower when driving with the compact spare tire compared to when driving with standard tires. Be careful when driving over uneven road surfaces. Driving with tire chains and the compact spare tire Do not fit tire chains to the compact spare tire. Tire chains may damage the vehicle body and adversely affect driving performance. When replacing the tires When removing or fitting the wheels, tires or the tire pressure warning valve and transmitter, contact your Toyota dealer as the tire pressure warning valve and transmitter may be damaged if not handled correctly. To avoid damage to the tire pressure warning valves and transmitters When a tire is repaired with liquid sealants, the tire pressure warning valve and transmitter may not operate properly. If a liquid sealant is used, contact your Toyota dealer or other qualified service shop as soon as possible. Make sure to replace the tire pressure warning valve and transmitter when replacing the tire. After taking out or stowing the spare tire Make sure to secure the tire carrier by tightening the clamp bolt to prevent the holding bracket from hitting the under body of the vehicle during driving. Using the tire carrier
|
 Stowing the flat tire
Take out the strap and tire bag.
Place tire standing up in rear
tub, after putting the tire in the
tire bag.
Clip clasp to outboard hook.
Clip other clasp to c ...
 If the engine will not
start
If the engine will not
start
If the engine will not start even though correct starting procedures
are being followed (, 228), consider each of the following
points:
The engine will not start even though the starter motor opera ...
Other materials:
Power Slide Door RH does not Operate When Satellite Switch is
Pressed
DESCRIPTION
The power slide door operates only when the power slide door main
switch is ON (switch free: orange
paint on the top of the switch appears). The power slide door ECU RH
controls the power slide door
RH, which activates the slide door motor to open / close the slide do ...
Side Airbag Sensor Assembly LH Circuit Malfunction
DTC B1141/33 Side Airbag Sensor Assembly LH Circuit Malfunction
DESCRIPTION
The side airbag sensor LH circuit consists of the center airbag sensor
assembly and side airbag sensor
LH.
If the center airbag sensor assembly receives signals from the side airbag
sensor LH, it judges whether or
...
Operating Light Control Rheostat does not Change Light Brightness
DESCRIPTION
The meter CPU receives signals for adjusting illumination on the meter from
this circuit. The meter CPU
detects the illumination level selected by the user according to the position of
the rheostat knob.
WIRING DIAGRAM
INSPECTION PROCEDURE
1 READ VALUE OF INTELLIGENT TESTER ...
