Toyota Sienna Service Manual: System description
1. OUTLINE OF THEFT DETERRENT SYSTEM
- When the theft deterrent system detects that the vehicle is being tampered with, the system sets off the alarm, causing the horns to sound and the lights to light up or blink in order to alert people around the vehicle to the theft.
- The theft deterrent system has 2 modes; one is the active arming mode (see ACTIVE ARMING MODE) and the other is passive arming mode (see PASSIVE ARMING MODE). The passive arming mode can be switched ON/OFF using the specified method.
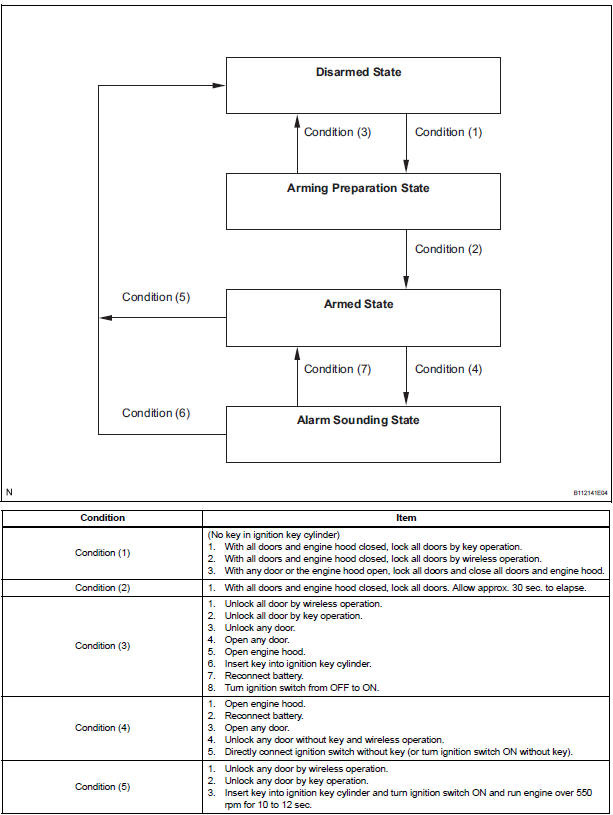
- Each mode has 4 states; a disarmed state, an arming preparation state, an armed state and an alarm sounding state.
- Disarmed state:
- The alarm function is not operating.
- The theft deterrent system is not operating.
- Arming preparation state:
- The time until the system goes into the armed state.
- The theft deterrent system is not operating.
- Armed state:
- The theft deterrent system is operating.
(4) Alarm sounding state:
- Alarm function is operating.
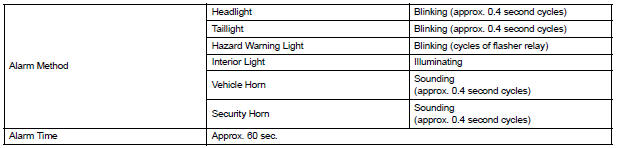
Alarm time: Approx. 60 sec.
Refer to table below for alarm method and time:
HINT: If any of the doors are unlocked with no key in the ignition key cylinder during the armed state, a forced door lock signal will be output (see FORCED DOOR LOCK CONTROL).
2. ACTIVE ARMING MODE
HINT:
- Active arming mode starts the alarm control immediately after the doors are locked.
- This system activates as described in the diagram below when one of items for each condition is met.
- Active arming mode

3. PASSIVE ARMING MODE
HINT:
- Passive arming mode starts the alarm control after the key is removed from the ignition key cylinder and doors are closed.
- Passive arming mode can be switched ON/OFF by the specified method.
- The alarm is initially set (when shipped from factory) to active arming mode (not passive arming mode).
- During passive arming mode, the theft deterrent system goes into the armed state even if the doors are not locked.
- Detecting that the doors are unlocked does not set off the alarm during passive arming mode.
- A forced door lock signal is not output during passive arming mode (see FORCED DOOR LOCK CONTROL).
- Although the theft deterrent system detects that the doors are opened during passive arming mode, the alarm will not go off immediately because an entry delay time is set.
- If any of the following conditions is met during passive arming mode, the theft deterrent system will switch to active arming mode.
- With all doors and engine hood closed, lock all doors by key operation.
- With all doors and engine hood closed, lock all doors by wireless operation.
- With any door or the engine hood open, lock all doors and close all doors and engine hood.
- This system activates as described in the diagram below when one of items for each condition is met.
- Passive arming mode

HINT:
- *1: Disarmed state (1) is the normal disarmed state.
- *2: Disarmed state (2) is set from either the disarmed state (1) or the arming preparation state.


HINT: *1: When any door is opened while all the doors are closed during passive arming mode, the entry delay time starts. If the switch condition (armed state → disarmed state (1) or (2)) is met during the entry delay time, the theft deterrent system will return to disarmed state (1) or (2). However, if the switch condition for disarmed state (1) or (2) is not met, the theft deterrent system will recognize it as a theft and set off the alarm.
Entry delay time of 0, 14 or 30 sec. can be selected by the customizing function.
4. FORCED DOOR LOCK CONTROL
- The forced door lock control prevents the vehicle from being tampered with. Immediately after a door is unlocked (alarm starts), the door is forced to lock by a forced door lock signal.
- Conditions that force the doors to lock: No key is in the ignition key cylinder and both of the following conditions are met.
- The theft deterrent system is in the alarm sounding state of active arming mode.
- Any door is unlocked.
5. ALARM MEMORY FUNCTION
- If the alarm is set off (tampering is detected) while the theft deterrent system is armed, it will be recorded by the alarm memory function. Whenever you cancel the theft deterrent system, the alarm memory function causes the taillights to light up for 2 seconds in order to inform you that the alarm has been set off.
- Conditions of the alarm memory function that cause the taillights to light up: When the theft deterrent system has entered into the alarm sounding state (tampering has been detected) even once, the taillights will light up for 2 seconds if any of the following conditions is met.
- Switched to the disarmed state from the armed state during active arming mode.
- Switched to the disarmed state (1) from the armed state during passive arming mode.
HINT: Active arming mode: See ACTIVE ARMING MODE.
Passive arming mode: See PASSIVE ARMING MODE.
6. PANIC ALARM CONTROL
- The panic alarm control makes it possible to voluntarily set off the panic alarm by pressing the PANIC switch on the wireless transmitter.
- Conditions that cause the panic alarm control to set off the panic alarm: The panic alarm control sets off the panic alarm by pressing the PANIC switch on the wireless transmitter for over 2, 4 seconds under the following conditions:
- The ignition switch is OFF.
- The theft deterrent system is not in the alarm sounding state. (This condition is common both to active arming mode and to passive arming mode.)
- Conditions that cause the panic alarm control to shut off the alarm: The panic alarm control shuts off the panic alarm when any of the following conditions is met during panic alarm operation:
- The ignition switch is turned ON.
- Either of the switches on the wireless transmitter (LOCK/UNLOCK) is pressed.
- The panic alarm ends (60 sec. have passed).
- The theft deterrent system switches to the alarm sounding state. Under this condition, the theft deterrent system is controlling the alarm rather than the panic alarm control. In order to cancel this alarm, refer to the theft deterrent system alarm sounding state cancellation procedure. (This condition is common both to active arming mode to passive arming mode.)
HINT: Active arming mode: See ACTIVE ARMING MODE.
Passive arming mode: See PASSIVE ARMING MODE.
7. SECURITY INDICATOR OUTPUT
- The multiplex network body ECU outputs a signal to light up the security indicator, according to the state of the theft deterrent system. However, some of the actual lighting conditions of the security indicator are different from the output signals of the multiplex network body ECU.
Output:
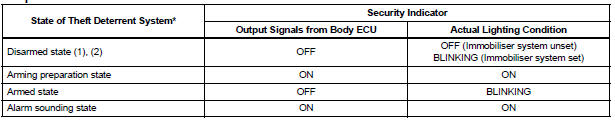
Blinking cycle:

HINT:
- *: The above condition is common both to active arming mode and to passive arming mode.
- When the immobiliser system is set, the security indicator blinks during both the disarmed state and the armed state, due to the output signals from the immobiliser system.
 Theft deterrent system
PARTS LOCATION
...
 How to proceed with
troubleshooting
How to proceed with
troubleshooting
HINT:
Use this procedure to troubleshoot the theft deterrent
system.
The intelligent tester should be used in step 2.
1 VEHICLE BROUGHT TO WORKSHOP
2 CUSTOMER PROBLEM ANALYSIS
In ...
Other materials:
Cruise control main switch
COMPONENTS
Removal
1. DISCONNECT BATTERY NEGATIVE TERMINAL
2. REMOVE STEERING WHEEL COVER LOWER NO.2
(24)
3. REMOVE STEERING WHEEL COVER LOWER NO.3
(24)
4. REMOVE HORN BUTTON ASSEMBLY
5. REMOVE CRUISE CONTROL MAIN SWITCH
Disconnect the connectors.
Remove the 2 ...
Engine front oil seal
COMPONENTS
REMOVAL
1. REMOVE FRONT WHEEL RH
2. REMOVE FRONT FENDER APRON SEAL RH (See
page EM-26)
3. REMOVE V-RIBBED BELT (See page EM-6)
4. REMOVE CRANKSHAFT PULLEY
(a) Using SST, loosen the crankshaft pulley bolt.
SST 09213-70011 (09213-70020), 09330-00021
(b) Using SST, remove ...
On-vehicle inspection
1. INSPECT DRIVE BELT
(a) Visually check the drive belt for excessive wear,
frayed cords, etc.
If any defect is found, replace the drive belt.
HINT:
Cracks on the rib side of a belt are considered
acceptable. Replace the belt if there are any
missing ribs.
2. CHECK POWER STEERING FLUID ...
