Toyota Sienna Service Manual: The Other Caller cannot Hear Your Voice, or Your Voice is too Quiet or Distorted
INSPECTION PROCEDURE
1 CHECK CELLULAR PHONE
- Check if the other side can hear your voice properly.
OK: Your voice can be heard correctly.
2 CHECK SETTINGS

- Check if the mute switch is set to ON.
OK: Mute switch is not set to ON.
3 CHECK SETTINGS
- Enter the "Handsfree Voice Quality Set" mode.
- Check if the Send Voice Level is set to "0".
HINT: The Send Voice Level can be set to 11 different levels, -5 to +5, with a 3 dB difference.
- Check if the Send Voice Level minimum or maximum level.
HINT: When the Send Voice Level is set to the minimum or maximum level, the sound may be distorted.
OK: The Send Voice Level is set to "0".
4 CHECK MICROPHONE (NAVIGATION CHECK MODE)
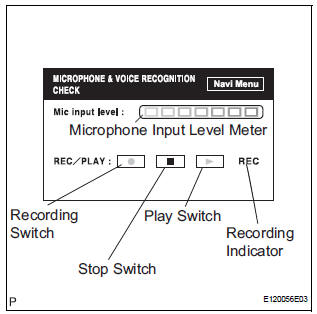
- Enter the "MICROPHONE & VOICE RECOGNITION CHECK" mode.
- When voice is input into the microphone, check that the microphone input level meter changes according to the input voice.
- Push the recording switch and perform voice recording.
HINT: Voice can be recorded up to 5 seconds.
- Check that the recording indicator remains on while recording and that the recorded voice is played normally without noise or distortion.
OK: All check results are normal.
REPLACE RADIO AND NAVIGATION ASSEMBLY
 The Other Caller's Voice cannot be Heard, is too Quiet, or Distorted
INSPECTION PROCEDURE
1 CHECK CELLULAR PHONE
Check if the voice on the other side can be heard using a
cellular phone.
OK:
Voice can be heard
2 CHECK NAVIGATION SYSTEM
Check that naviga ...
 Black Screen
INSPECTION PROCEDURE
1 CHECK DISPLAY SETTING
Check that the display is not in "Screen OFF" mode.
OK:
The display setting is not in "Screen OFF" mode.
2 CHECK IMAGE QUALIT ...
Other materials:
Power Slide Door RH does not Operate When Using Inside / Outside
Handle
DESCRIPTION
The inside / outside handles have the ability to control operation
of the power slide door. Pulling either
handle transmits a request signal to the power slide door ECU RH, which then
commands the power
slide door control motor and clutch to open / close the power sli ...
Installation
1. INSTALL NO. 2 REAR SEAT OUTER BELT ASSEMBLY
NOTICE:
Do not disassemble the retractor.
Check the degree of tilt when the No. 2 rear seat
outer belt assembly begins to lock the ELR.
Check that the belt does not lock within 15 of
tilt in all directions but that the be ...
Correct driving posture
Adjust the angle of the seatback so that you are sitting straight up and
so that you do not have to lean forward to steer.
Adjust the seat so that you can depress the pedals fully and so that
your arms bend slightly at the elbow when gripping the steering wheel.
Lock the head rest ...
