Toyota Sienna Service Manual: Tire Pressure Warning Reset Switch Circuit
DESCRIPTION
The ECU enters the initialization mode and performs initialization automatically, when the tire pressure warning ECU receives the signal from the tire pressure warning reset switch. If the ECU receives the signal, the tire pressure warning light blinks 3 times (1 second on, 1 second off).
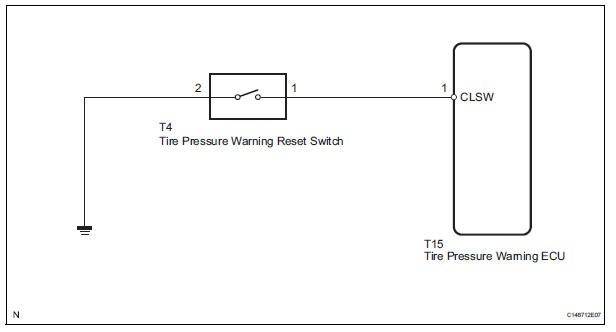
WIRING DIAGRAM
INSPECTION PROCEDURE
1 CHECK TIRE PRESSURE WARNING RESET SWITCH FUNCTION
(a) Perform the tire pressure warning reset switch test in TEST MODE PROCEDURE (See page TW-25).
OK: Reset switch ON: Tire pressure warning light comes on.
Reset switch OFF: Tire pressure warning light blinks.


END
2 INSPECT TIRE PRESSURE WARNING RESET SWITCH
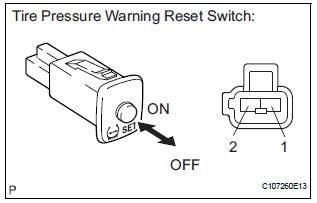
(a) Disconnect the tire pressure warning reset switch connector.
(b) Measure the resistance between terminals 1 and 2 of the tire pressure warning reset switch when the tire pressure warning switch is ON and OFF.
Standard resistance 

3 CHECK HARNESS AND CONNECTOR (TIRE PRESSURE WARNING RESET SW - TIRE PRESSURE WARNING ECU)
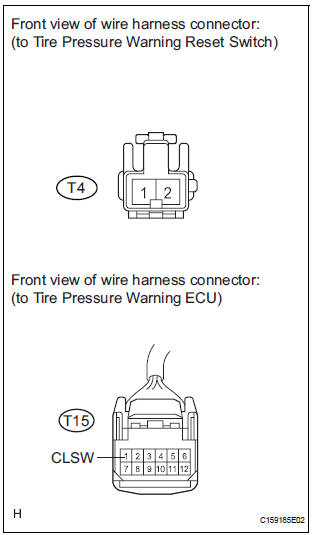
(a) Disconnect the tire pressure warning reset switch T4 connector and tire pressure warning ECU T15 connector.
(b) Measure the resistance according to the value(s) in the table below.
Standard resistance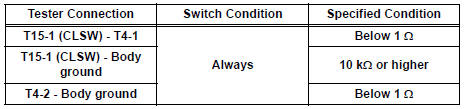


REPLACE TIRE PRESSURE WARNING ECU (See page TW-87)
 Vehicle Speed Signal Error (Test Mode DTC)
DTC C2191/91 Vehicle Speed Signal Error (Test Mode DTC)
DESCRIPTION
The tire pressure warning ECU receives a speed signal from the combination
meter. This DTC is stored
upon entering test mode, a ...
 Tire Pressure Warning Light Circuit
DESCRIPTION
If the ECU detects trouble, the tire pressure warning light blinks (comes on
after blinking for 1 minute) and
tire pressure monitor is cancelled at the same time. At this time, the ECU ...
Other materials:
Installation
1. INSTALL REAR SEAT 3 POINT TYPE BELT
ASSEMBLY (for 8-Passenger)
HINT: Refer to the instructions for reassembly of the rear
No. 1 seat assembly (for center seat).
Install the rear seat 3 point type belt assembly with
the bolt.
Torque: 42 N*m (430 kgf*cm, 31 ft.*lbf)
2. INSTALL ...
Installation
1. Install air fuel ratio sensor (for bank 2
sensor 1)
(a) Using SST, install the sensor to the exhaust
manifold LH.
SST 09224-00010
Torque: 40 N*m (408 kgf*cm, 30 ft.*lbf) for use
with SST
44 N*m (449 kgf*cm, 32 ft.*lbf) for use
without SST
HINT:
Use a torque wrench with a fulcrum ...
Disassembly
1. REMOVE BRAKE MASTER LESS RESERVOIR TANK CYLINDER SUB-ASSEMBLY
(a) Using soft jaws on the vise, hold the brake master
cylinder in a vise through aluminum plates.
(b) Using a screwdriver, remove the O-ring.
(c) Using SST, remove the brake tube from the brake
master cylinder.
SST 09023 ...
