Toyota Sienna Service Manual: Disassembly
1. FIX FRONT SHOCK ABSORBER WITH COIL SPRING
(a) Install 2 nuts and a bolt to the bracket at the lower side of the front shock absorber with coil spring and secure it in a vise.
2. REMOVE FRONT SUSPENSION SUPPORT SUBASSEMBLY LH
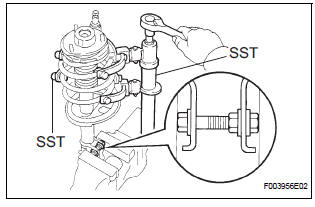
(a) Using SST, compress the front coil spring LH
SST 09727-30021 (09727-00010, 09727-00021, 09727-00031)
NOTICE: Do not use an impact wrench. It will damage the SST.
HINT: Use 2 SST of the same type.
(b) Remove the lock nut and the front suspension support sub-assembly
3. REMOVE FRONT SUSPENSION SUPPORT LH BEARING
4. REMOVE FRONT COIL SPRING SEAT UPPER LH
5. REMOVE FRONT COIL SPRING INSULATOR UPPER LH
6. REMOVE FRONT COIL SPRING LH
7. REMOVE FRONT SPRING BUMPER LH
8. REMOVE FRONT COIL SPRING INSULATOR LOWER LH
9. REMOVE SHOCK ABSORBER ASSEMBLY FRONT LH
 Removal
1. Remove front wheel
2. Remove front wiper arm head cap
Hint:
(see page ww-3)
3. Remove fr wiper arm rh
HINT:
(See page WW-3)
4. Remove fr wiper arm lh
HINT:
(See page WW-3)
5. Remove cowl ...
 Inspection
1. INSPECT SHOCK ABSORBER ASSEMBLY FRONT LH
(a) Compress and extend the shock absorber rod and
check that there is no unusual resistance or unusual
sound during operation.
If there is any ab ...
Other materials:
Reassembly
1. INSTALL REAR DRIVE SHAFT OUTBOARD JOINT BOOT
HINT:
Before install the boot, wrap the spline of the outboard
joint shaft with vinyl tape to prevent the boot from
bearing damaged.
(a) Install new outboard joint boot, 2 outboard joint boot
clamps, 2 inboard joint boot clamps and inboard
j ...
Meter Illumination is Always Dark
DESCRIPTION
Confirm that the vehicle is equipped with the optitron meter, then
check this circuit.
The combination meter assembly receives a auto dimmer signal from the
body ECU by the multiplex
communication line.
WIRING DIAGRAM
INSPECTION PROCEDURE
1 CHECK MULTIPLEX CO ...
Scratched / Reversed Disc
DTC 44-46 Scratched / Reversed Disc
DESCRIPTION
DTC No.
DTC Detecting Condition
Trouble Area
44-46
Scratches or dirt is found on DVD surface or DVD is set
upside down.
DVD
Television display assembly
INSPECTION PROCEDURE
HI ...
