Toyota Sienna Service Manual: Initialization
1. RESET MEMORY
NOTICE:
|
HINT:
The ECM memorizes the condition that the ECT controls the automatic transaxle assembly and engine assembly according to those characteristics. Therefore, when the automatic transaxle assembly, engine assembly, or ECM has been replaced, it is necessary to reset the memory so that the ECM can memorize the new information.
Reset procedure is as follows.
(a) Turn the engine switch off.
(b) Connect the intelligent tester together with the CAN VIM (controller area network vehicle interface module) to the DLC3.
(c) Turn the ignition switch to the ON position and push the intelligent tester main switch on.
(d) Select the item "DIAGNOSIS / ENHANCED OBD II".
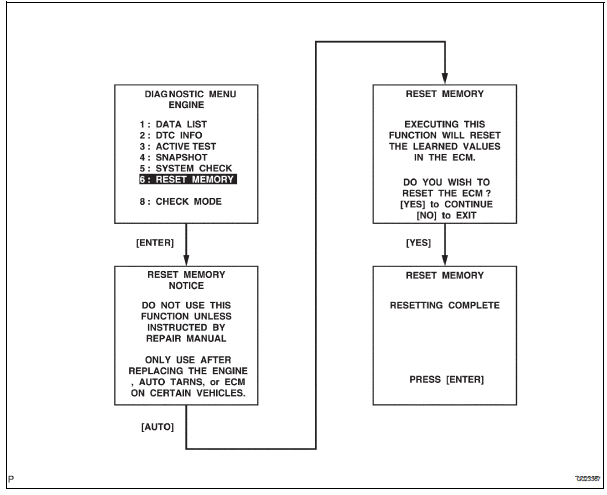
(e) Perform the reset memory procedure from the ENGINE menu.
| CAUTION: After performing the RESET MEMORY, be sure to perform the ROAD TEST (See page AX-9) described earlier. |
HINT: The ECM is learned by performing the ROAD TEST.
(1) Tester menu flow:

 Manual shifting test
1. Perform manual shifting test
Hint:
With this test, it can be determined whether the
trouble occurs in the electrical circuit or is a
mechanical problem in the transaxle.
If any abnormali ...
 Monitor drive pattern
1. MONITOR DRIVE PATTERN FOR ECT TEST
(a) Perform this drive pattern as one method to
simulate the detection conditions of the ECT
malfunctions. (The DTCs may not be detected due
the actual drivin ...
Other materials:
Installation
1. INSTALL FRONT PASSENGER AIRBAG ASSEMBLY
Install the front passenger airbag assembly with the
2 screws.
2. INSTALL INSTRUMENT PANEL SUB-ASSEMBLY
3. CONNECT FRONT PASSENGER AIRBAG ASSEMBLY CONNECTOR
Connect the connector to the front passenger airbag
assembly.
...
Installation
1. INSTALL ROOF HEADLINING ASSEMBLY
w/ sliding roof:
Install the roof headlining with the 5 clips.
w/o sliding roof:
Install the roof headlining with the 3 clips.
NOTICE:
In order to prevent the roof headlining from
becoming bent, work must be performed by 2 or
more persons when ...
Removal
1. REMOVE BACK DOOR CENTER GARNISH (See page
ET-18)
2. REMOVE POWER BACK DOOR ROD (See page ED-
220)
3. REMOVE BACK DOOR LH SIDE GARNISH
4. REMOVE BACK DOOR RH SIDE GARNISH
5. REMOVE BACK DOOR PULL STRAP (See page ED-
221)
6. REMOVE BACK DOOR TRIM BOARD ASSEMBLY
7. REMOVE LH BACK-UP LIGH ...
