Toyota Sienna Service Manual: Inspection
1. INSPECT LOWER BALL JOINT ASSEMBLY FRONT LH
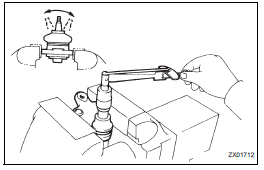
(a) As shown in the illustration, flip the ball joint stud back and forth 5 times, before installing the nut.
(b) Using a torque wrench, turn the nut continuously at a rate of 3 - 5 seconds per 1 turn and take the torque reading on the 5th turn.
Turning torque: 0.98 to 3.43 N*m (10 to 35 kgf*cm, 8.7 to 30 in.*lbf)
 Removal
1. REMOVE FRONT WHEEL
2. REMOVE FRONT AXLE HUB LH NUT
HINT:
(See page AH-4)
SST 09930-00010
3. SEPARATE SPEED SENSOR FRONT LH
HINT:
(See page AH-4)
4. SEPARATE FRONT DISC BRAKE CALIPER
ASSEMB ...
 Installation
1. INSTALL LOWER BALL JOINT ASSEMBLY FRONT LH
(a) Install the lower ball joint assembly front LH and
tighten the nut.
Torque: 123 N*m (1,250 kgf*cm, 91 ft.*lbf)
(b) Install a new cotter pin.
NO ...
Other materials:
Insufficient Coolant Temperature for Closed
Loop Fuel Control
DTC P0125 Insufficient Coolant Temperature for Closed
Loop Fuel Control
DESCRIPTION
Refer to DTC P0115
DTC No.
DTC Detection Condition
Trouble Area
P0125
Engine coolant temperature (ECT) does not reach
closed-loop enabling temperature for 20 minutes (t ...
Installation
1. INSTALL BRAKE MASTER CYLINDER
(a) Install the brake master cylinder with the 2 nuts.
Torque: 13 N*m (130 kgf*cm, 9 ft.*lbf)
(b) Slide the clip and connect the brake master cylinder
reservoir hose.
(c) Using SST, connect the 2 brake tube to the brake
master cylinder.
SST 09023-001 ...
Installation
1. INSTALL PARKING BRAKE CABLE ASSEMBLY NO.3
(a) Install the parking brake cable LH guide to the
parking brake cable assembly No. 3.
(b) Connect the parking brake cable No. 3 to the
parking brake cable equalizer.
(c) Install the parking brake cable No. 3 with the 3 bolts
and button.
T ...
