Toyota Sienna Service Manual: Installation
1. INSTALL HEADLIGHT ASSEMBLY
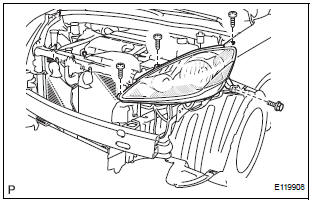
- Connect the connectors.
- Install the headlight assembly with the bolt and 3 screws.
2. INSTALL FRONT BUMPER ASSEMBLY
3. CONNECT CABLE TO NEGATIVE BATTERY TERMINAL
4. VEHICLE PREPARATION FOR HEADLIGHT AIMING
5. PREPARATION FOR HEADLIGHT AIMING (Using a tester)
6. PREPARATION FOR HEADLIGHT AIMING (Using a screen)
7. HEADLIGHT AIMING INSPECTION
8. HEADLIGHT AIMING ADJUSTMENT
9. VEHICLE PREPARATION FOR FOG LIGHT AIMING
10. PREPARATION FOR FOG LIGHT AIMING
11. FOG LIGHT AIMING INSPECTION
12. FOG LIGHT AIMING ADJUSTMENT
 Reassembly
1. INSTALL LIGHT CONTROL ECU (DISCHARGE HEADLIGHT)
Install a new headlight leveling motor base packing.
Install the headlight leveling motor assembly as
shown in the illustrati ...
 Repair
1. INSTALL HEADLIGHT PROTECTOR RETAINER UPPER
HINT:
If the installation area of the headlight assembly is
damaged, use the supply bracket for low-cost repair.
Ensure that the headli ...
Other materials:
Pressure Control Solenoid "A" Electrical (Shift
Solenoid Valve SL1)
DESCRIPTION
Shifting from 1st to 5th is performed in combination with "ON" and "OFF"
operation of the shift solenoid
valves SL1, SL2, SL3, S4 and SR which are controlled by the ECM. If an open or
short circuit occurs in
either of the shift solenoid valves, the ECM cont ...
Removal
1. REMOVE FRONT WHEELS
2. REMOVE ENGINE UNDER COVER NO.1
3. DRAIN AUTOMATIC TRANSAXLE FLUID
(a) Remove the drain plug, gasket and drain ATF.
(b) Install a new gasket and the drain plug.
Torque: 49 N*m (500 kgf*cm, 36 ft.*lbf)
4. REMOVE FRONT DRIVE SHAFT ASSEMBLY LH
HINT:
(See page DS-6)
...
Check mode procedure
1. CHECK MODE (SIGNAL CHECK): DTC CHECK
Connect the intelligent tester to the DLC3.
Turn the ignition switch to the ON position.
Select the "SIGNAL CHECK", and proceed
checking using the intelligent tester.
NOTICE:
Select the "SIGNAL CHECK" from the ...
