Toyota Sienna Service Manual: Installation
1. INSTALL SLIDING ROOF HOUSING ASSEMBLY
- Install the housing with the 6 nuts.
- Install the 4 brackets with the 8 bolts.
- Connect the 4 hoses and drive gear connector.
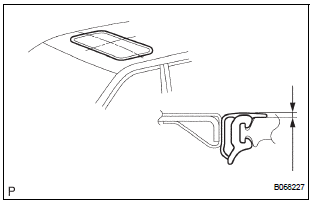
2. ADJUST SLIDING ROOF GLASS SUB-ASSEMBLY

- Check for a difference in levels between the sliding roof (roof glass) and roof panel.
Difference: 0 +- 2.0 mm (0.072 in.)
NOTICE: The clearance should be even all around
3. INSTALL SLIDING ROOF GLASS SUB-ASSEMBLY
- Using a torx wrench T25, loosen the screw to adjust the sliding roof panel position. When the adjustment has been done, tighten the screw there.
4. RESET SLIDING ROOF POSITION
5. CHECK FOR WATER LEAKS
- Adjusting the sliding roof, check that there is no
water leak.
If a leak is found, readjust the sliding roof.
6. INSTALL ROOF HEADLINING ASSEMBLY
 Removal
1. REMOVE ROOF HEADLINING ASSEMBLY
2. REMOVE SLIDING ROOF SIDE GARNISH LH
Disengage the 3 claws.
Disengage the rear clip.
Disengage the front clip.
Remove the slide garnish by pulling i ...
 Sliding roof switch assembly
ON-VEHICLE INSPECTION
1. INSPECT SLIDING ROOF SWITCH ASSEMBLY
Remove the switch.
Check the resistance between the terminals when
operating the switch.
Resistance
If the result is no ...
Other materials:
Disposal
HINT:
When scrapping a vehicle equipped with the SRS or
disposing of the steering pad, be sure to deploy the airbag
first in accordance with the procedure described below. If any
abnormality occurs with airbag deployment, contact the
SERVICE DEPT. of TOYOTA MOTOR SALES, U.S.A., INC.
CAUTION:
...
Terminals of ECU
1. RADIO RECEIVER (10 SPEAKER SYSTEM)
*1: with Rear Seat Entertainment System
2. RADIO RECEIVER (6 SPEAKER SYSTEM)
*1: with Rear Seat Entertainment System
*2: without Rear Seat Entertainment System
3. STEREO COMPONENT AMPLIFIER
4. TELEVISION DISPLAY ASSEMBLY ...
Cruise control main switch
COMPONENTS
Removal
1. DISCONNECT BATTERY NEGATIVE TERMINAL
2. REMOVE STEERING WHEEL COVER LOWER NO.2
(24)
3. REMOVE STEERING WHEEL COVER LOWER NO.3
(24)
4. REMOVE HORN BUTTON ASSEMBLY
5. REMOVE CRUISE CONTROL MAIN SWITCH
Disconnect the connectors.
Remove the 2 ...
