Toyota Sienna 2010-2026 Owners Manual: Adjustment procedure
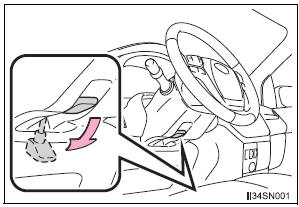
- Hold the steering wheel and push the lever down.

- Adjust to the ideal position by
moving the steering wheel horizontally
and vertically.
After adjustment, pull the lever up to secure the steering wheel.
 Steering wheel
...
 Horn
Horn
To sound the horn, press on or
close to the mark.
WARNINGCaution while driving
Do not adjust the steering wheel while driving.
Doing so may cause the driver to mishandle the vehic ...
Other materials:
If a warning message is displayed
If a warning message is shown on the multi-information display,
stay calm and perform the following actions:
Master warning light
The master warning light also comes on or flashes in order to indicate that
a message is currently being displayed on the multi-information display.
Multi- ...
Security Indicator Light Circuit
DESCRIPTION
Even when the theft deterrent system is in the disarmed state, the security
indicator blinks due to a signal
output from the immobiliser system. The security indicator blinks continuously
due to a continuous signal
received from the immobiliser system while in the armed state.
...
Short to B+ in Curtain Shield Squib LH Circuit
DTC B1168/86 Short to B+ in Curtain Shield Squib LH Circuit
DESCRIPTION
The curtain shield squib LH circuit consists of the center airbag sensor
assembly and the curtain shield
airbag assembly LH.
The circuit instructs the SRS to deploy when deployment conditions are met.
DTC B1168/86 is ...
