Toyota Sienna 2010-2026 Owners Manual: Speaking on the phone
The following screen is displayed when speaking on the phone.
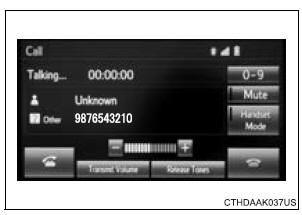
To adjust the call volume
Select “-” or “+”. You can also adjust the volume using the steering switches or the volume knob.
To prevent the other party from hearing your voice
Select “Mute”.
Inputting tones
When using phone services such as an answering service or a bank, you can store phone numbers and code numbers in the contact.
- Select “0-9”.
- Input the number.
Release Tones
“Release Tones” appear when a continuous tone signal(s) containing a (w) is registered in the contact list.
- Select “Release Tones
Release Tones
- A continuous tone signal is a character string that consists of numbers and the characters p or w. (e.g.056133w0123p#1)
- When the “p” pause tone is used, the tone data up until the next pause tone will be automatically sent after 2 seconds have elapsed. When the “w” pause tone is used, the tone data up until the next pause tone will be automatically sent after a user operation is performed.
- Release tones can be used when automated operation of a phone based service such as an answering machine or bank phone service is desired. A phone number with continuous tone signals can be registered in the contact list.
- Tone data after a “w” pause tone can be operated on voice command during a call
To transfer a call
Select “Handset Mode” to on from a hands-free call to a cellular phone call.
Select “Handset Mode” to off from a cellular phone call to a hands-free call.
Transmit volume setting
- Select “Transmit Volume”.
- Select the desired level for the transmit volume.
- Select “OK”.
To hang up
Press the  switch on the steering
wheel or select  .
.
Call waiting
When a call is interrupted by a third party while talking, an incoming call message will be displayed.
To talk with the other party:
- Press the
 switch on
the steering wheel. - Select
 .
.
To refuse the call: - Press the
 switch on
the steering wheel. - Select
 .
.
Every time you press the  switch
on the steering wheel or select
during call waiting, you will be switched to the other party.
Transferring calls
- If you transfer from the cellular phone to hands-free, the hands-free screen will be displayed, and you can operate the system using the screen.
- Transfer method and operation may vary according to the cellular phone used.
- For operation of the cellular phone in use, see the phone’s manual.
Call waiting operation
Call waiting operation may differ depending on your phone company and cellular phone.
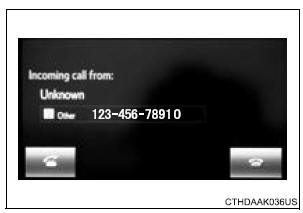
 Receiving a call
When a call is received, the following screen is displayed
together with a sound.
To answer the phone
Press the switch on the steering
wheel or select .
To refuse a call
Press the switch o ...
 Bluetooth® phone
message function
Bluetooth® phone
message function
Received messages can be forwarded from the connected
Bluetooth® phone, enabling checking and replying using the
audio system.
Depending on the type of Bluetooth® phone connected, received
mes ...
Other materials:
Short to GND in Front Pretensioner Squib LH
Circuit
DTC B0137/71 Short to GND in Front Pretensioner Squib LH
Circuit
DESCRIPTION
The front pretensioner squib LH circuit consists of the center airbag sensor
assembly and the front seat
outer belt assembly LH.
This circuit instructs the SRS to deploy when deployment conditions are met.
DTC B ...
Changing the rear setting
Adjusting the temperature setting
Press the “REAR” button (indicator and rear temperature on the
display on).
Turn the “REAR TEMP” dial clockwise to increase the temperature
and counterclockwise to decrease the temperature.
The air conditioning system switches between individual ...
Short to GND in Side Squib LH Circuit
DTC B0117/45 Short to GND in Side Squib LH Circuit
DESCRIPTION
The side squib LH circuit consists of the center airbag sensor assembly and
the front seat side airbag
assembly LH.
This circuit instructs the SRS to deploy when deployment conditions are met.
DTC B0117/45 is recorded when a s ...
