Toyota Sienna 2010-2026 Owners Manual: Third outside seats
- To use
Pull the head restraints up. - To fold
Press the button
Removing the head restraints
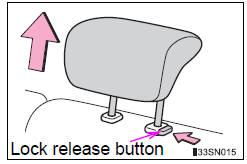
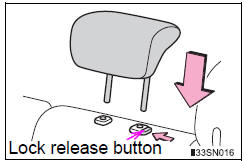
- Front and second outside seats
Pull the head restraint up while pressing the lock release button.

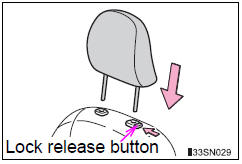
- Second center* and third center seats
Pull the head restraint up while pressing the lock release button.
*: 8-passenger models only
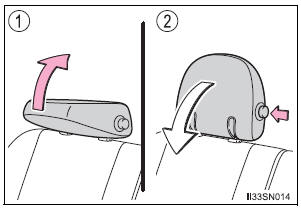
- Third outside seats
The head restraint cannot be removed.
Installing the head restraints
- Front and second outside seats
Align the head restraint with the installation holes and push it down to the lock position.
Press and hold the lock release button when lowering the head restraint.
- Second center* and third center seats
Align the head restraint with the installation holes and push it down to the lock position.
Press and hold the lock release button when lowering the head restraint.
*: 8-passenger models only
Adjusting the height of the head restraints
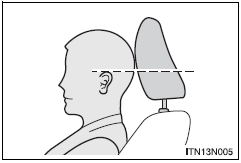
Make sure that the head restraints are adjusted so that the center of the head restraint is closest to the top of your ears.
Adjusting the center seat head restraints
Always raise the head restraint one level from the stowed position when using.
| WARNING Head restraint precautions Observe the following precautions regarding the head restraints. Failure to do so may result in death or serious injury.
|
 Second center* and third center seats
Up
Pull the head restraints up.
Down
Push the head restraint down while
pressing the lock release button.
*: 8-passenger models only ...

Other materials:
Reassembly
1. INSTALL PLANETARY GEAR
(a) Apply grease to the planetary gears and pin parts of
the planetary shaft.
(b) Install the 3 planetary gears.
2. INSTALL STARTER ARMATURE ASSEMBLY
(a) Apply grease to the plate washer and the armature
shaft.
(b) Install the starter armature to the star ...
Customize parameters
HINT:
The following items can be customized.
NOTICE:
After confirming whether the items requested by the
customer are applicable or not for customization,
perform customizing operations.
Be sure to record the current settings before
customization.
When troubleshooti ...
Rear Clearance Sonar Sensor LH Circuit
DESCRIPTION
An ultrasonic sensor consists of a sensor portion that transmits and receives
ultrasonic waves and a preamplifier
that amplifies them. The ultrasonic sensor outputs the ultrasonic waves and
sends the received
signals to the clearance warning ECU.
WIRING DIAGRAM
INSPECTION PR ...
