Toyota Sienna 2010-2024 Owners Manual: Engine coolant
The coolant level is satisfactory if it is between the ŌĆ£FULLŌĆØ and ŌĆ£LOWŌĆØ lines on the reservoir when the engine is cold.
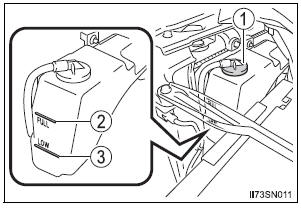
- Reservoir cap
- ŌĆ£FULLŌĆØ line
- ŌĆ£LOWŌĆØ line
If the level is on or below the ŌĆ£LOWŌĆØ line, add coolant up to the ŌĆ£FULLŌĆØ line.
Coolant selection
Only use ŌĆ£Toyota Super Long Life CoolantŌĆØ or similar high quality ethylene glycol based non-silicate, non-amine, non-nitrite, and non-borate coolant with long-life hybrid organic acid technology.
U.S.A.: ŌĆ£Toyota Super Long Life CoolantŌĆØ is a mixture of 50% coolant and 50% deionized water.
(Minimum temperature: -31F [-35C]) Canada: ŌĆ£Toyota Super Long Life CoolantŌĆØ is a mixture of 55% coolant and 45% deionized water.
(Minimum temperature: -44F [-42C]) For more details about engine coolant, contact your Toyota dealer.
If the coolant level drops within a short time of replenishing
Visually check the radiator, hoses, engine coolant reservoir caps, drain cock and water pump.
If you cannot find a leak, have your Toyota dealer test the cap and check for leaks in the cooling system.
| WARNING When the engine is hot Do not remove the engine coolant reservoir cap. The cooling system may be under pressure and may spray hot coolant if the cap is removed, causing serious injuries, such as burns. |
| NOTICE When adding coolant Coolant is neither plain water nor straight antifreeze. The correct mixture of water and antifreeze must be used to provide proper lubrication, corrosion protection and cooling. Be sure to read the antifreeze or coolant label. If you spill coolant Be sure to wash it off with water to prevent it from damaging parts or paint. |
 Engine oil
With the engine at operating temperature and turned off, check the oil
level on the dipstick.
Checking the engine oil
Park the vehicle on level ground. After warming up the engine
and turn ...
 Radiator and condenser
Check the radiator and condenser and clear away any foreign objects.
If either of the above parts is extremely dirty or you are not sure of
their condition, have your vehicle inspected by your Toy ...
Other materials:
Installation
1. INSTALL FRONT SEAT ASSEMBLY LH
Place the seat assembly in the cabin.
NOTICE:
Be careful not to damage the body.
Connect the connectors under the seat assembly.
Tighten the 2 bolts on the front side of the seat
assembly.
Torque: 37 N*m (375 kgf*cm, 27 ft.*lb ...
Reassembly
1. INSTALL NO. 1 SEAT CUSHION FRAME SUBASSEMBLY
Install the seat cushion frame with the bolt.
Torque: 20.6 N*m (210 kgf*cm, 15 ft.*lbf)
2. INSTALL RECLINING CONTROL LINK SUBASSEMBLY
Install the reclining control link with the E-ring.
Install the nut.
3. INSTALL RE ...
Operation flow
HINT:
Perform troubleshooting in accordance with the
procedures below. The following is an outline of basic
troubleshooting procedures. Confirm the troubleshooting
procedures for the circuit you are working on before
beginning troubleshooting.
VEHICLE BROUGHT TO WORKSHOP
CUSTOMER PR ...
