Toyota Sienna 2010-2026 Owners Manual: Active head restraints
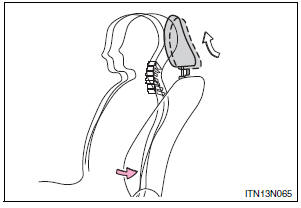
When the occupant’s lower back presses against the seatback during a rear-end collision, the head restraint moves slightly forward and upward to help reduce the risk of whiplash on the seat occupant
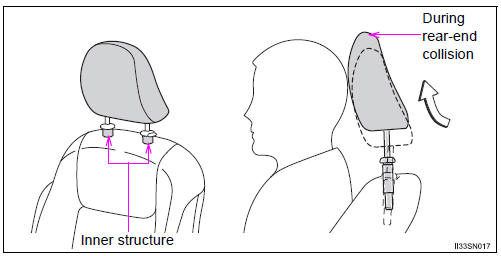
Active head restraints
Even small forces applied to the seatback may cause the head restraint to move. When a locked head restraint is pushed up forcibly, the head restraint inner structure may appear. This does not indicate a problem.
| WARNING When adjusting the seat position
Seat adjustment
|
 Adjustment procedure
Manual seat
Seat position adjustment lever
Seatback angle adjustment lever
Vertical height adjustment lever (driver’s side only)
Lumbar support adjustment switch (driver’s side ...
 Rear seats
...
Other materials:
Under hood
GENERAL MAINTENANCE
1. GENERAL NOTES
Maintenance requirements very depending on the
country.
Check the maintenance schedule in the owner's
manual supplement.
Following the maintenance schedule is mandatory.
Determine the appropriate time to service the vehicle
using either miles dri ...
Reassembly
1. INSTALL LIGHT CONTROL ECU (DISCHARGE HEADLIGHT)
Install a new headlight leveling motor base packing.
Install the headlight leveling motor assembly as
shown in the illustration.
Connect the connector with the claw
Install the light control ECU with the 2 ...
Operation check
1. DOOR LOCK FAIL-SAFE
When a malfunction in the door control switch
(manual switch, interlocked with key operation) has
been detected, door lock/unlock operation becomes
disabled.
2. CHECK ELECTRICAL DOOR LOCK OPERATION
Check the basic function.
Check that a ...
