Toyota Sienna Service Manual: Installation
1. INSTALL HEADLIGHT ASSEMBLY
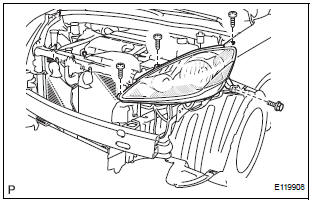
- Connect the connectors.
- Install the headlight assembly with the bolt and 3 screws.
2. INSTALL FRONT BUMPER ASSEMBLY
3. CONNECT CABLE TO NEGATIVE BATTERY TERMINAL
4. VEHICLE PREPARATION FOR HEADLIGHT AIMING
5. PREPARATION FOR HEADLIGHT AIMING (Using a tester)
6. PREPARATION FOR HEADLIGHT AIMING (Using a screen)
7. HEADLIGHT AIMING INSPECTION
8. HEADLIGHT AIMING ADJUSTMENT
9. VEHICLE PREPARATION FOR FOG LIGHT AIMING
10. PREPARATION FOR FOG LIGHT AIMING
11. FOG LIGHT AIMING INSPECTION
12. FOG LIGHT AIMING ADJUSTMENT
 Reassembly
1. INSTALL LIGHT CONTROL ECU (DISCHARGE HEADLIGHT)
Install a new headlight leveling motor base packing.
Install the headlight leveling motor assembly as
shown in the illustrati ...
 Repair
1. INSTALL HEADLIGHT PROTECTOR RETAINER UPPER
HINT:
If the installation area of the headlight assembly is
damaged, use the supply bracket for low-cost repair.
Ensure that the headli ...
Other materials:
Fuel tank
Components
REMOVAL
1. DISCHARGE FUEL SYSTEM PRESSURE
(See page FU-1)
2. REMOVE CHARCOAL CANISTER PROTECTOR (See
page FU-30)
3. REMOVE REAR FLOOR NO. 2 CROSSMEMBER BRACE LH
(a) Remove the 2 bolts and the rear floor No. 2
crossmember brace LH.
4. REMOVE FUEL TANK FILLER HOSE COVER ...
If your vehicle needs to
be towed
If towing is necessary, we recommend having your vehicle
towed by your Toyota dealer or commercial towing service,
using a wheel-lift type truck or flat bed truck.
Use a safety chain system for all towing, and abide by all state/
provincial and local laws.
2WD models: If towing your vehicle ...
Installation
1. INSTALL REAR DOOR WINDOW FRAME MOULDING
Remove the tape from the rear door window frame
moulding.
Clean the contact surface of the vehicle body with
white gasoline.
Clean the outer circumference of the rear door
window frame moulding with white gasoline.
Apply new double-sided ...
