Toyota Sienna 2010-2026 Owners Manual: Cleaning and protecting the vehicle exterior
Perform the following to protect the vehicle and maintain it in prime condition:
- Working from top to bottom, liberally apply water to the vehicle body, wheel wells and underside of the vehicle to remove any dirt and dust.
- Wash the vehicle body using a sponge or soft cloth, such as a chamois.
- For hard-to-remove marks, use car wash soap and rinse thoroughly with water.
- Wipe away any water.
- Wax the vehicle when the waterproof coating deteriorates.
If water does not bead on a clean surface, apply wax when the vehicle body is cool.
Automatic car washes
- Before washing the vehicle:
- Fold the mirrors.
- Turn off the power back door system. (if equipped)
- Turn off the power sliding door system. (if equipped)
Start washing from the front of the vehicle. Make sure to extend the mirrors before driving.
- Brushes used in automatic car washes may scratch the vehicle surface and harm your vehicle’s paint.
High pressure car washes
- Do not allow the nozzles of the car wash to come within close proximity of the windows.
- Before using the car wash, check that the fuel filler door on your vehicle is closed properly.
When using a car wash (vehicles with a smart key system)
- If the door handle becomes wet while the electronic key is within the effective range, the door may lock and unlock repeatedly. Place the key in a position 6 ft. (2 m) or more separate from the vehicle while the vehicle is being washed. (Take care to ensure that the key is not stolen.)
- If the electronic key is inside the vehicle and a door handle becomes wet during a car wash, a message may be shown on the multi-information display and a buzzer will sound outside the vehicle. To turn off the alarm, lock all the doors.
Aluminum wheels
- Remove any dirt immediately by using a neutral detergent. Do not use
hard
brushes or abrasive cleaners. Do not use strong or harsh chemical cleaners.
Use the same mild detergent and wax as used on the paint.
- Do not use detergent on the wheels when they are hot, for example after driving for long distance in the hot weather.
- Wash detergent from the wheels immediately after use.
Bumpers and side moldings
Do not scrub with abrasive cleaners
| WARNING When washing the vehicle Do not apply water to the inside of the engine compartment. Doing so may cause the electrical components etc. to catch fire. When cleaning the windshield (vehicles with rain-sensing windshield wiper)
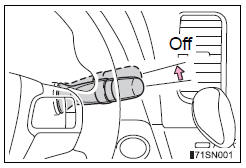
Set the wiper switch to off. If the wiper switch is in “AUTO”, the wipers may operate unexpectedly in the following situations, and may result in hands being caught or other serious injuries and cause damage to the wiper blades.
Precautions regarding the exhaust pipe Exhaust gasses cause the exhaust pipe to become quite hot. When washing the vehicle, be careful not to touch the pipe until it has cooled sufficiently, as touching a hot exhaust pipe can cause burns. Precaution regarding the Blind Spot Monitor If the paint of the rear bumper is chipped or scratched, the system may malfunction. If this occurs, consult your Toyota dealer. |
| NOTICE To prevent paint deterioration and corrosion on the body and components (aluminum wheels etc.)
Cleaning the exterior lights
When using an automatic car wash (vehicles with rain-sensing windshield wipers) Set the wiper switch to the off position. If the wiper switch is in “AUTO”, the wipers may operate and the wiper blades may be damaged. When using a high pressure car wash Do not bring the nozzle tip close to boots (rubber or resin manufactured cover), connectors or the following parts. The parts may be damaged if they come into contact with high-pressure water.
|

 Cleaning and protecting
the vehicle interior
Cleaning and protecting
the vehicle interior
The following procedures will help protect your vehicle’s interior
and keep it in top condition:
Protecting the vehicle interior
Remove dirt and dust using a vacuum cleaner. Wipe dirty surfaces
...
Other materials:
Disassembly
1. REMOVE RETURN TUBE NO.2
(a) Using SST, remove the return tube No. 2.
SST 09023-12701
2. REMOVE STEERING LEFT TURN PRESSURE TUBE
(a) Using SST, remove the left turn pressure tube.
SST 09023-38201
(b) Remove the 2 O-rings from the left turn pressure
tube.
3. REMOVE STEERING RIGH ...
Ignition Coil Primary / Secondary Circuit
DTC P0351 Ignition Coil "A" Primary / Secondary Circuit
DTC P0352 Ignition Coil "B" Primary / Secondary Circuit
DTC P0353 Ignition Coil "C" Primary / Secondary Circuit
DTC P0354 Ignition Coil "D" Primary / Secondary Circuit
DTC P0355 Ignition Coil "E& ...
Tire Pressure Warning Reset Switch Circuit
DESCRIPTION
The ECU enters the initialization mode and performs initialization
automatically, when the tire pressure
warning ECU receives the signal from the tire pressure warning reset switch. If
the ECU receives the
signal, the tire pressure warning light blinks 3 times (1 second on, 1 seco ...
