Toyota Sienna 2010-2026 Owners Manual: Past record
- Type A
Press the “CAR” button.
- Type B
Press the “APPS” button, and then select “Eco” on the screen.
If the “Trip Information” screen is displayed, select “Past Record”.
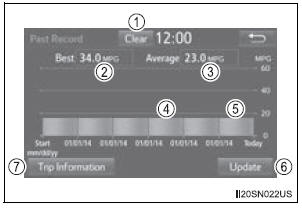
- Reset the past record data
- Best recorded fuel consumption
- Average fuel consumption (if equipped)
- Previous fuel consumption record
- Current fuel consumption
- Update the past record data
- “Trip Information” screen appears
The average fuel consumption history is divided by color into past averages and the average fuel consumption since the last updated.
Use the displayed average fuel consumption as a reference.
These images are examples only, and may vary slightly from actual conditions.
Updating the past record data
Update the average fuel consumption by selecting “Update” to measure the current fuel consumption again.
Also, the average fuel consumption displayed in the multi-information display will be reset at the same time.
Resetting the data
Selecting “Clear” on the “Trip Information” screen will reset the trip information data.
Selecting “Clear” on the “Past Record” screen will reset the past record data.
Cruising range
Displays the estimated maximum distance that can be driven with the quantity of fuel remaining.
This distance is computed based on your average fuel consumption.
As a result, the actual distance that can be driven may differ from that displayed.
 Trip information
Type A
Press the “CAR” button.
Type B
Press the “APPS” button, and then select “Eco” on the screen.
If the “Past Record” screen is displayed, select “Trip Information ...

Other materials:
Rear Door ECU RH Communication Stop
DTC B1216 Rear Door ECU RH Communication Stop
DESCRIPTION
DTC B1216 is output when communication between the power slide door ECU RH
and the multiplex
network gateway ECU stops for more than 10 seconds.
DTC No.
DTC Detection Condition
Trouble Area
B1216
...
Removal
1. REMOVE REAR WHEEL
2. REMOVE REAR SHOCK ABSORBER CAP LH
(a) Remove the shock absorber head cover.
(b) Remove the shock absorber cap LH.
3. REMOVE SHOCK ABSORBER ASSEMBLY REAR LH
(a) Support the rear axle beam with a jack.
(b) Using a 6 mm hexagon wrench to hold the piston
rod, ...
Installation
1. INSTALL REAR NO. 2 SEAT ASSEMBLY
Lock the seat leg rear to the floor striker.
Lock the seat leg front to the floor striker.
Install the rear No. 2 seat assembly with the 8 bolts.
Torque: 19 N*m (194 kgf*cm, 14 ft.*lbf)
NOTICE:
Tighten the bolts in the order sho ...
