Toyota Sienna Service Manual: Removal
1. REMOVE FRONT DOOR LOWER FRAME BRACKET GARNISH
2. REMOVE FRONT DOOR INSIDE HANDLE BEZEL PLUG
3. REMOVE FRONT DOOR ARMREST BASE PANEL ASSEMBLY
4. REMOVE BACK FRAME PLATE
5. REMOVE POWER WINDOW REGULATOR MASTER SWITCH ASSEMBLY
6. REMOVE FRONT DOOR TRIM BOARD SUBASSEMBLY
7. REMOVE OUTER REAR VIEW MIRROR ASSEMBLY (See page MI-42)
8. REMOVE FRONT DOOR GLASS WEATHERSTRIP
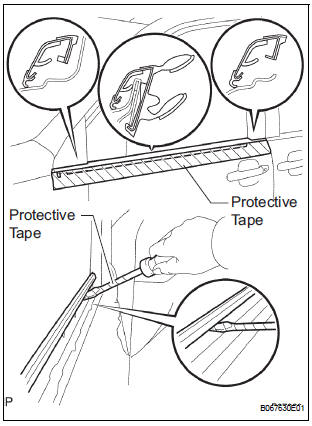
- Put protective tape under the front door glass weatherstrip.
- Using a screwdriver or moulding remover, remove the front door glass weatherstrip.
HINT: Tape the screwdriver tip before use.
 Front door glass weatherstrip
COMPONENTS
...
 Installation
1. INSTALL FRONT DOOR GLASS WEATHERSTRIP
Install the front door grass weatherstrip.
2. INSTALL OUTER REAR VIEW MIRROR ASSEMBLY
(See page MI-45)
3. INSTALL FRONT DOOR TRIM BOARD SUBASSEMBLY
4 ...
Other materials:
Memory recall function
Each electronic key can be registered to recall your preferred driving
position.
Registering procedure
Record your driving position to button “1” or “2” before performing
the following:
Carry only the key you want to register, and then close the driver’s
door.
If 2 or more keys ar ...
Problem symptoms table
POWER SLIDE DOOR SYSTEM
Symptom
Suspected Area
Power slide door LH does not operate when switch* is
pressed (* switch indicates satellite switch for power
slide door LH and power slide door control switch LH)
ECU-B fuse
Power slide door main switch ...
How to proceed with troubleshooting
HINT:
Use the following procedures to troubleshoot the tire
pressure warning system.
*: Use the intelligent tester.
1 VEHICLE BROUGHT TO WORKSHOP
2 CUSTOMER PROBLEM ANALYSIS
(a) Interview the customer to confirm the trouble.
HINT:
It is important to collect as much specific informat ...
