Toyota Sienna Service Manual: Removal
1. REMOVE ROOF HEADLINING ASSEMBLY
2. REMOVE SLIDING ROOF SIDE GARNISH LH
- Disengage the 3 claws.
- Disengage the rear clip.
- Disengage the front clip.
- Remove the slide garnish by pulling it rearward.
3. REMOVE SLIDING ROOF SIDE GARNISH RH
HINT: Use the same procedures described above for the LH side.
4. REMOVE SLIDING ROOF GLASS SUB-ASSEMBLY
- Using a torx wrench (T25), remove the 4 screws and sliding roof glass.
5. REMOVE SLIDING ROOF HOUSING ASSEMBLY
- Disconnect the 4 hoses and drive gear wire harness connector.
- Remove the 8 bolts and 4 brackets.
- Remove the 6 nuts and housing.
6. REMOVE SLIDING ROOF DRIVE GEAR SUBASSEMBLY
- Remove the 2 bolts and drive gear.
7. REMOVE SUNSHADE TRIM SUB-ASSEMBLY
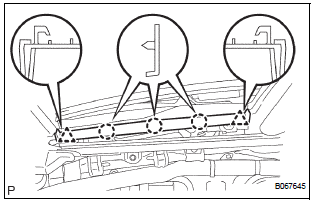
8. REMOVE ROOF DRIP CHANNEL REAR
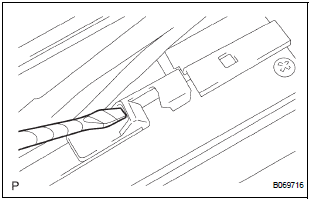
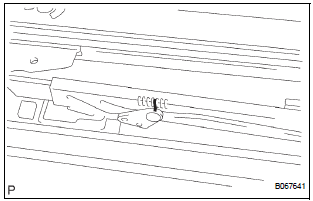
9. REMOVE SLIDING ROOF DRIVE CABLE LH
- Remove the 4 guide clips.
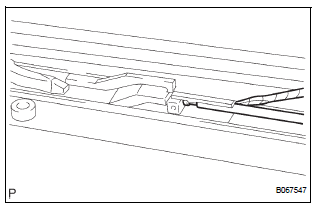
- Using a screwdriver, separate the link rod from the link holder, as shown in the illustration.
HINT: Tape the screwdriver tip before use
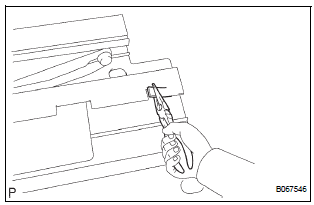
- Using long nose pliers, level the part indicated in the illustration.
- Pull out the deflector lifter link and drive cable together.
10. REMOVE SLIDING ROOF DRIVE CABLE RH
HINT: Use the same procedures described above for the LH side.
11. REMOVE ROOF WIND DEFLECTOR PANEL SUBASSEMBLY
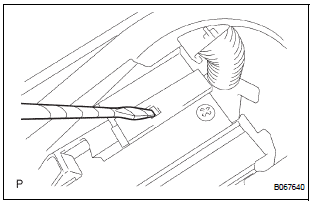
- Using a screwdriver, disengage the claw of the panel, as shown in the illustration.
HINT: Tape the screwdriver tip before use.
- Using a screwdriver, push hard the part indicated in the illustration to remove the panel.
HINT: Tape the screwdriver tip before use.
12. REMOVE SLIDING ROOF HOUSING PANEL
- Remove the 2 screws and housing panel.
13. ADJUST FULLY CLOSE POSITION
- Using a screwdriver, slide the drive cable of the sliding roof to align the matchmarks.
HINT: Tape the screwdriver tip before use.
 Sliding roof housing
COMPONENTS
...
 Installation
1. INSTALL SLIDING ROOF HOUSING ASSEMBLY
Install the housing with the 6 nuts.
Install the 4 brackets with the 8 bolts.
Connect the 4 hoses and drive gear connector.
2. ADJUST SLIDING ROOF G ...
Other materials:
Selecting conventional constant speed control mode
Constant speed control mode differs from vehicle-to-vehicle distance
control mode. When constant speed control mode is selected, your
vehicle will maintain a set speed regardless of whether or not there
are other vehicles in the lane ahead.
Press the “ON-OFF” button to
activate the ...
Registration
HINT:
Register the recognition code when replacing the door
control transmitter or the door control receiver.
Add mode is used to register new recognition codes while
still retaining codes already registered. This mode is used
when a new transmitter is added. If the number of ...
Inspection
1. INSPECT MASS AIR FLOW METER
Visually check for any foreign matter on the
platinum hot wire (heater) of the mass air flow
meter.
OK:
There is no foreign matter.
If the result is not as specified, replace the mass air
flow meter.
Measure the resistance according to the ...
